Orbital Virtual Terminal Quick Reference Guide - Chase Paymentech
Orbital Virtual Terminal Quick Reference Guide - Chase Paymentech
Orbital Virtual Terminal Quick Reference Guide - Chase Paymentech

You also want an ePaper? Increase the reach of your titles
YUMPU automatically turns print PDFs into web optimized ePapers that Google loves.
The <strong>Orbital</strong> ® <strong>Virtual</strong><br />
<strong>Terminal</strong> allows you to<br />
process and manage<br />
payment transactions<br />
online.<br />
All you need to accept<br />
credit cards online is<br />
a <strong>Chase</strong> <strong>Paymentech</strong><br />
merchant services<br />
account*, an Internet<br />
connection and a web<br />
browser - it’s that easy.<br />
Have questions Just<br />
press Play and watch<br />
our <strong>Virtual</strong> <strong>Terminal</strong><br />
how-to videos.<br />
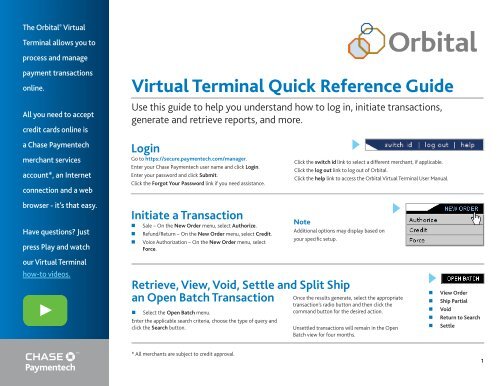
<strong>Virtual</strong> <strong>Terminal</strong> <strong>Quick</strong> <strong>Reference</strong> <strong>Guide</strong><br />
Use this guide to help you understand how to log in, initiate transactions,<br />
generate and retrieve reports, and more.<br />
Login<br />
Go to https://secure.paymentech.com/manager.<br />
Enter your <strong>Chase</strong> <strong>Paymentech</strong> user name and click Login.<br />
Enter your password and click Submit.<br />
Click the Forgot Your Password link if you need assistance.<br />
Initiate a Transaction<br />
• Sale – On the New Order menu, select Authorize.<br />
• Refund/Return – On the New Order menu, select Credit.<br />
• Voice Authorization – On the New Order menu, select<br />
Force.<br />
• Select the Open Batch menu.<br />
Enter the applicable search criteria, choose the type of query and<br />
click the Search button.<br />
Click the switch id link to select a different merchant, if applicable.<br />
Click the log out link to log out of <strong>Orbital</strong>.<br />
Click the help link to access the <strong>Orbital</strong> <strong>Virtual</strong> <strong>Terminal</strong> User Manual.<br />
Note<br />
Additional options may display based on<br />
your specific setup.<br />
Retrieve, View, Void, Settle and Split Ship<br />
an Open Batch Transaction<br />
Once the results generate, select the appropriate<br />
transaction’s radio button and then click the<br />
command button for the desired action.<br />
Unsettled transactions will remain in the Open<br />
Batch view for four months.<br />
• View Order<br />
• Ship Partial<br />
• Void<br />
• Return to Search<br />
• Settle<br />
* All merchants are subject to credit approval.<br />
1
For Additional<br />
Assistance<br />
To speak with a<br />
member<br />
of <strong>Chase</strong><br />
<strong>Paymentech</strong>’s<br />
<strong>Orbital</strong> Gateway<br />
Support<br />
group, call<br />
1.866.645.1314,<br />
or email<br />
<strong>Virtual</strong> <strong>Terminal</strong> <strong>Quick</strong> <strong>Reference</strong> <strong>Guide</strong> cont.<br />
Review Settled Batches and Transactions<br />
On the Review menu, select the option to search by - batch or transaction.<br />
Available transactions are settled and can be up to six months old.<br />
Initiate a Gift Card Transaction<br />
Note: Gift Card is available only for U.S. and Canadian merchant accounts.<br />
• Authorize, Redeem, Add Value and Refund – On the Gift Card menu, select New Transaction and then<br />
choose the Auth, Redemption, Add Value, or Refund radio button.<br />
• Balance Inquiry – On the Gift Card menu, select Balance Inquiry.<br />
• Activate, Reactivate and Deactivate – On the Gift Card menu, select Activation and then choose the<br />
Single Activation, Block Activation, Single Reactivation or Single Deactivation radio button.<br />
• View, Manage and Generate Reports on Settled/Unsettled Gift Card Transactions – On the Gift Card menu,<br />
select Current Transactions to specify an unsettled transaction; select Historical Transactions to specify<br />
a settled transaction. Gift card transactions are settled daily at 5 a.m. EST.<br />
GatewaySupport@<br />
<strong>Chase</strong><strong>Paymentech</strong>.com.<br />
Retrieve Reports<br />
User accounts with administrative rights can<br />
select the Reporting option to retrieve previously<br />
generated reports.<br />
Note<br />
Once generated, reports and files will be available<br />
for up to seven days.<br />
Admin<br />
User accounts with administrative rights have the option<br />
to select from the Admin menu and accomplish the<br />
following tasks:<br />
• Specify the AVS or CVD response codes to decline.<br />
• Create, search, edit or delete customer profiles.<br />
• Designate a schedule for Managed Billing.<br />
• Specify options for purchase cards, AVS and settlement.<br />
• Administer scheduled reports.<br />
• Define the unit of measure options for Purchase Card III.<br />
• Modify the text that appears on receipts.<br />
• Generate auto emails for Managed Billing customers.<br />
• Specify options for soft declines.<br />
Import Files<br />
User accounts with administrative rights can select the Import File menu option to upload a CSV file.<br />
Contact your <strong>Chase</strong> <strong>Paymentech</strong> representative to have your CSV file tested and certified prior to uploading.<br />
2<br />
©2014, <strong>Chase</strong> <strong>Paymentech</strong> Solutions, LLC. All rights reserved.