Sign In With Apple in 7 Steps — As Deep As Possible

Sign In With Apple is an authentication system created by Apple. iCloud users can authenticate apps for retrieving their full names and email addresses. Apple provides a proxy email service for users who want to hide their email addresses from app owners who request their email addresses. Under the control of the proxy email system, app owners have to register their domain at the Apple server first in order to send emails to clients.
Apple provides the Authentication Service Framework to provide a simple to use authentication tool for developers to implement into their apps easily. Developers have to first configure the capability at the Apple Developer Console followed by coding at the app side. It can be divided into only 7 STEPS! 👏🏼
Sign In With Apple is a necessary login option for apps that offer any 3rd party authentication options, including Google Sign-In, Facebook, Instagram and Twitter, etc. Therefore, you can see more and more apps are now offering Sign In With Apple option in their apps.
Before start
Sign In With Apple can ONLY be run on a real device and therefore you MUST have an Apple Developer Account for generating a provisioning profile for installing your development app into a real device.
Step 1) Create/ Update the provisioning profile with Sign In With Apple

Visit the Apple Developer Console and create an app identifier with Sign In With Apple feature.

Then generate a provisioning profile for your just created app instance.

Import the provisioning profile to your Xcode project.
Step 2) Add Sign In With Apple at Xcode Project

Click the “+Capability” button at your target tab and select the “Sign in With Apple” function.
Runtime error with code
1000will be returned from the Authentication Services framework to thedidCompleteWithErrorcallback if the “Sign in With Apple” capability is not enabled.To see more, please refer to the “Error handling” section at Step 5).
Step 3) Add an ASAuthorizationAppleIDButton

Add an UIButton to your UIViewController and assign the class type to ASAuthorizationAppleIDButton.
What is the advantage of using an ASAuthorizationAppleIDButton instead of a normal UIButton? Here are some of the points:
- Apple has a strict human interface guideline on the Sign In With Apple button, e.g. the dimensions (min 140W x min 30H), corner radius and the shown button title. To ensure a smooth Apple review, we should use the
ASAuthorizationAppleIDButton. - The
AuthenticationServicesframework can support multiple languages and change the button title according to the device locale. It lessens developers’ workload!

ASAuthorizationAppleIDButton in different languages3. ASAuthorizationAppleIDButton supports light and dark themes. Developers can init the button programmatically to select the theme.

Step 4) Create an ASAuthorizationRequest


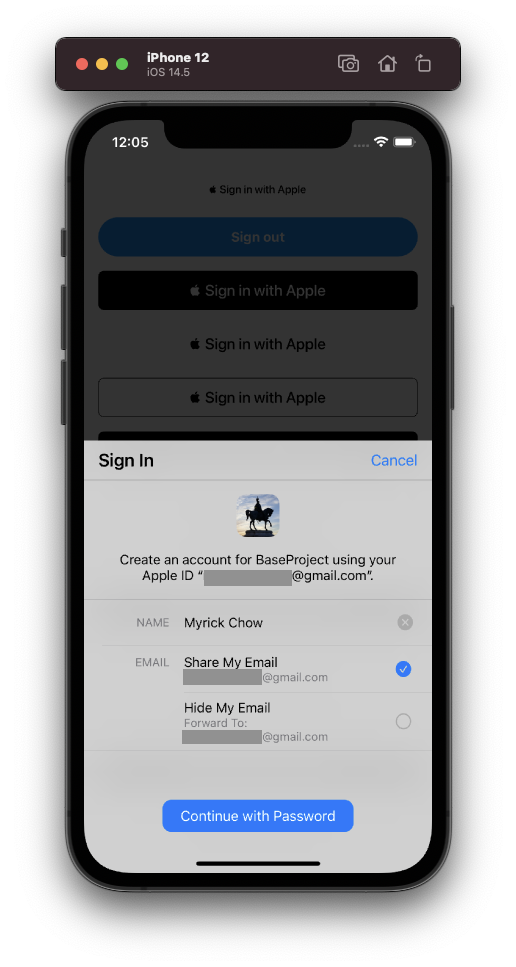
We have to define what types of user’s information we actually need. According to the latest version of AuthenticationServices, there are only two possible fields for developers to request:
- Full name (Given name + Family name)
- Email address (Actual one or Apple’s proxy email address)

Apple provides an option for users to hide his/her actual email address from the app owner by providing a proxy email address. In the big picture, Apple will be a middleman which is responsible for forwarding the app owner’s email to the app user’s email address. Extra SMTP relay verifications have to be configured with the Apple server before sending emails to clients. Therefore, even app database is hacked by hackers, hackers cannot send junk emails to users without the proper SMTP relay verification.
Step 5 Implement the ASAuthorizationControllerDelegate
Data handling
AuthenticationServices can return the authentication information to the app at the didCompleteWithAuthorization callback. The information is packed at the credential field of the ASAuthorization object. There are some important fields to be highlighted:
user— AnStringidentifier to a userfullName— APersonNameComponentsobject which consists ofgivenNameandfamilyNamefieldsemail— Either the user’s actual email address or the Apple proxy email address in a format of “abcPrefix@privaterelay.appleid.com”identityToken— ADatathat represents a JSON Web Token (JWT). You can decode the token with online tools such as JWT.io. You can find theiss(issuer),aud(bundle identifier) andemailfields in the decoded token.

Error handling
There are two possible errors thrown from the didCompleteWithError :
- Error code 1000
The app entitlement does NOT include the “Sign In With Apple” capability. You have to read Step 2) again. - Error code 1001
User cancels the Sign In With Apple flow.
Step 6 Implement the ASAuthorizationControllerPresentationContextProviding
The presentationContextProvider is a delegate that provides a display context in which the system can present an authorization interface to the user. We can simply return the window of the current UIViewController as of the ASPresentationAnchor.
Step 7 Make a request
The final step is pretty straightforward. We just have to ask the ASAuthorizationController instance to request personal information from the user.
You can now handle the user information at the didCompleteWithAuthorization callback of the ASAuthorizationControllerDelegate which is introduced in Step 5).
Development Practical Skills
Issue One: Cannot Select Options after 1st successful sign-in

You would probably try to sign in multiple times through “Sign In With Apple” for testing your code. However, the UI of ASAuthorizationController changes and hides the options for choosing what kind of information to be shared after the first successful sign-in.
Why? This is because of Apple’s greatest UX theory — “Respect What User Has Chosen”. Once the user has granted/declined the request of his/her full name or email address, app developers should not ask the user again! The user therefore just needs to decide if he/she wants to sign in with Apple this time😉.
Issue Two: Full name and email address are both nil !!! after 1st successful sign-in

Do you find that the information stored at the returned credential are not consistent between each sign-in? 🤔
At the 2nd attempt, the given name, family name and email address are all nil even the user has granted his/her personal information to the app. See the above screenshot at the didCompleteWithAuthorization callback of ASAuthorizationControllerDelegate.
Is it a bug of the AuthenticationServices framework? No. It is actually planned to be! According to the Apple framework engineer’s answer at the Apple Developer Forum, user info is only sent in the ASAuthorizationAppleIDCredential upon initial user sign up and it is highly recommended that app developers should securely store the user’s credential locally until an account is successfully created at our server!
In other words, app developers cannot update or add extra scope the
requestedScopesfield once the user has granted the information. We should bear in mind about this issue before launching the app.
See the Step 4) for setting therequestedScopes
Revoke the Apple ID Logins permission

During the app development stage, developers and QA testers have to sign in with Apple multiple times to check if the app and server run smoothly even user does not grant certain information. So, how do we test it on the same device multiple times without changing different iCloud accounts?
We can navigate to the Settings app > Password & Security > Apps using Apple ID > [your app] > Click the “Stop using Apple ID” in order to revoke the sign-in status.

You can also do this at the iCloud Account Management website.
Get Notification when User Revokes the Authentication
Once the user has revoked the Sign In With Apple permission, app developers should send this event to the server and let the backend developers decide if it is suitable to temporarily suspend or even delete the user’s account.
The AuthenticationServices framework provides a ASAuthorizationAppleIDProvider.credentialRevokedNotification which can be observed by the app simply through the NotificationCenter. See the code above. You can test this code by revoking the sign-in status at the iCloud Account Management website.
Get Login State
If your app is not alive or in the foreground when the user revokes the sign-in status, you will miss the notification. Apple provides another function to get the latest credential state at run time. We can take extra actions when the credential state is not “authorized”.
How to Send Email to Proxy Email Address?

Although this is trivially a kind of backend topic, it is still worth to be discussed here. A proxy email address is created once the user does not want to share his/her actual email address with the app owner. It is controlled by Apple. In order to communicate with the Apple server, it is required to configure the Private Email Relay Service first at the Apple Developer Console. The processes include registering the domains and communication emails.
If you directly send an email to the proxy email address from your personal email mailbox, e.g. Gmail, you will receive an error of 550 5.1.1 Relay not allowed. See the above for the error screenshot.
One More Little Thing
The ASAuthorizationController can ONLY support in portrait mode on iPhone. Users have to switch back to portrait mode to proceed with the Sign In With Apple flow. In my opinion, it would be better if it can support in landscape mode but I believe Apple does it intentionally and wisely. 😉
Summary
Sign In With Apple is a tool provided by Apple for further protecting users’ privacy. Users can choose to disclose their full names and real email addresses to the app owner. Apple generates a proxy email address for users who want to hide their actual email address from others.
App owners have to set up SMTP configuration and register domain and other details at Apple Developer Console in order to send emails to users’ proxy email addresses.
For the coding part, it mainly focuses on ASAuthorizationController which can make a request to users for their personal information and return it through the ASAuthorizationControllerDelegate. We have to bear in mind that we cannot update once the user has granted it before. We have to securely save the user credential locally until an account is successfully created on the server side!
References


Thank you for reading this article. Hope you find it interesting and useful! You are welcome to follow me and contact me through the following channels: