Email is one of the fastest ways to communicate in the modern world. You can receive messages from friends, receipts, and even pictures and video over email. Signing up with Comcast gives you a Comcast email along with access to a web portal to use that email.
If you want to use another client to access your email this guide will assist you setting up your Comcast email with those clients.
2. Comcast Client Question
In order to proceed we need to know which client you're wanting to use with your email.
Your client is the interface you use to access your email. This may be a webpage or a software program.
Windows Mail
Mac Mail
Outlook 2016
Android
iPhone
3. IMAP vs POP3
Both IMAP and POP3 are email protocols. IMAP stands for Internet Message Access Protocol. POP3 stands for Post Office Protocol.
POP was the original protocol designed to download your emails to your local drive. IMAP came later and keeps your emails on the server.
Advantages of POP
Mail is stored locally on your computer and is accessible even without internet connection.
Internet connection is needed only for sending and receiving mail.
Option to leave copy of mail on server.
Consolidate multiple email accounts and servers into one inbox.
Advantages of IMAP
Mail is stored on a remote server and accessible from multiple different locations.
An Internet connection is needed to access mail.
Faster overview as only headers are downloaded until content is explicitly requested.
Mail is automatically backed up if server is managed properly.
Saves local storage space.
Option to store mail locally.
We recommend using IMAP. It's a more modern protocol. IMAP allows you to store your email on remote servers and synchronize your email among multiple devices, which is extremely important today, when most people have at least two devices - their laptop and smartphone.
4. Comcast Email Setup for Windows Mail (IMAP)
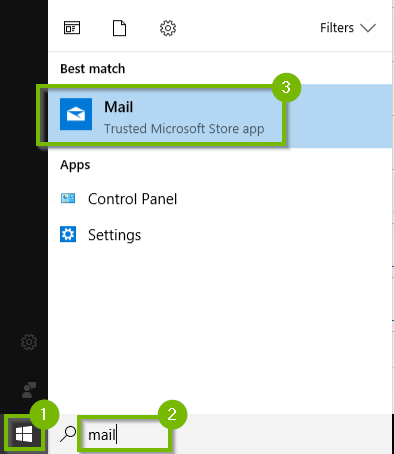
Click Start, type mail in the search box, then launch Mail.
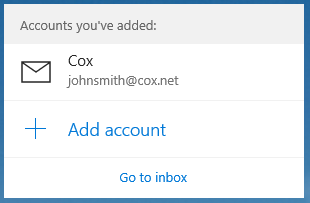
Click Accounts then Add Account.
Pick Other Account. Scroll down if it isn't visible.
Enter your Email address, password and then hit Sign-in.
Fill in your name and then click Sign-in.
If you are prompted, click Go to inbox.
Click the Sync button to sync the mail to the client. This may take some time but is usually done automatically.
5. Comcast Email Setup for Windows Mail (POP3)
POP is not recommended for the following reasons:
You have to delete or file the same email on every device.
Logging into each device, you will see lots of unread emails with no indication of which you deleted, read, flagged or filed.
Any folders you created and organize on one device won't be replicated on the other devices.
It is strongly recommended that you use IMAP. IMAP allows you to store their email on remote servers. This two-way protocol also allows you to synchronize your email among multiple devices, which is extremely important today, when most people have at least two devices - their laptop and smartphone.
Click Start, type mail in the search box, then launch Mail.
Click Accounts then Add Account. If this is first time Mail has been opened, click Add Account.
Pick Advanced setup. Scroll down if it isn't visible.
Click Internet email.
Fill in the form with the following information: .EmailYour email address (ex. "johndoe@comcast.net")User NameSometimes this is the name in front of the @ symbol (ex. "johndoe")PasswordYour passwordAccount NameThe name Mail will use for your Account (ex. "John Doe")Send Your Messages Using This NameThe name that will appear in your email (ex. "John Doe")Incoming Email Servermail.comcast.net:995:1Account TypePOP3Outgoing Email Serversmtp.comcast.net:465:1
All four boxes should be left checked.
Click Sign in.
If you are prompted, click Go to inbox.
Click the Sync button to sync the mail to the client. This may take some time but it normally happens automatically.
6. IMAP vs POP3
Both IMAP and POP3 are email protocols. IMAP stands for Internet Message Access Protocol. POP3 stands for Post Office Protocol.
POP was the original protocol designed to download your emails to your local drive. IMAP came later and keeps your emails on the server.
Advantages of POP
Mail is stored locally on your computer and is accessible even without internet connection.
Internet connection is needed only for sending and receiving mail.
Option to leave copy of mail on server.
Consolidate multiple email accounts and servers into one inbox.
Advantages of IMAP
Mail is stored on a remote server and accessible from multiple different locations.
An Internet connection is needed to access mail.
Faster overview as only headers are downloaded until content is explicitly requested.
Mail is automatically backed up if server is managed properly.
Saves local storage space.
Option to store mail locally.
We recommend using IMAP. It's a more modern protocol. IMAP allows you to store your email on remote servers and synchronize your email among multiple devices, which is extremely important today, when most people have at least two devices - their laptop and smartphone.
7. Comcast Email Setup for Mac Mail (IMAP)
Open Mail via the Dock icon or Applications then Mail.
Select Mail and then Add Account.
Select Add Other Mail Account.
Click Continue and type in the account details:
Click Sign In.
Mail should sign in at this point and ask you which apps you want to use with the account. Select all and hit Done.
Click Done.
Mail should automatically sync.
8. Comcast Email Setup for Mac Mail (POP3)
POP is not recommended for the following reasons:
You have to delete or file the same email on every device.
Logging into each device, you will see lots of unread emails with no indication of which you deleted, read, flagged or filed.
Any folders you created and organize on one device won't be replicated on the other devices.
It is strongly recommended that you use IMAP. IMAP allows you to store their email on remote servers. This two-way protocol also allows you to synchronize your email among multiple devices, which is extremely important today, when most people have at least two devices - their laptop and smartphone.
Open Mail via the Dock icon or Applications then Mail.
Select Mail, then Add Account.
Select Add Other Mail Account, then hit Continue.
Type in the account details.
Click Sign In.
Mail should refuse your sign in at this point and ask you for additional information.
For Incoming Mail Server, use mail.comcast.net.
For Outgoing Mail Server, use smtp.comcast.net.
Click Sign In.
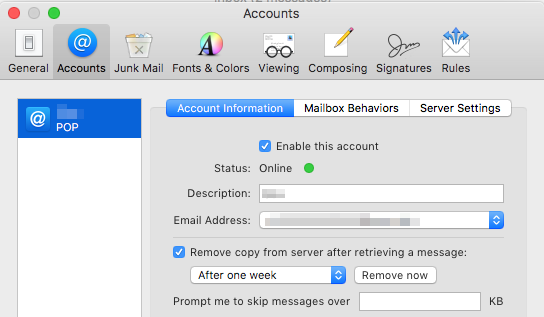
Click Mail, then Preferences.
Click the Accounts tab.
Click the account you just created.
Click the Server Settings tab and un-check both Automatically manage connection settings checkboxes.
For Incoming Mail Server change the port to 995. Then check Use TLS / SSL if not enabled.
For Outgoing Mail Server change the port to 465. Then check Use TLS / SSL if not enabled.
At the bottom of the window, click Save.
Mail should automatically sync.
9. IMAP vs POP3
Both IMAP and POP3 are email protocols. IMAP stands for Internet Message Access Protocol. POP3 stands for Post Office Protocol.
POP was the original protocol designed to download your emails to your local drive. IMAP came later and keeps your emails on the server.
Advantages of POP
Mail is stored locally on your computer and is accessible even without internet connection.
Internet connection is needed only for sending and receiving mail.
Option to leave copy of mail on server.
Consolidate multiple email accounts and servers into one inbox.
Advantages of IMAP
Mail is stored on a remote server and accessible from multiple different locations.
An Internet connection is needed to access mail.
Faster overview as only headers are downloaded until content is explicitly requested.
Mail is automatically backed up if server is managed properly.
Saves local storage space.
Option to store mail locally.
We recommend using IMAP. It's a more modern protocol. IMAP allows you to store your email on remote servers and synchronize your email among multiple devices, which is extremely important today, when most people have at least two devices - their laptop and smartphone.
10. Comcast Email Setup for Outlook 2016 (IMAP)
Open Outlook.
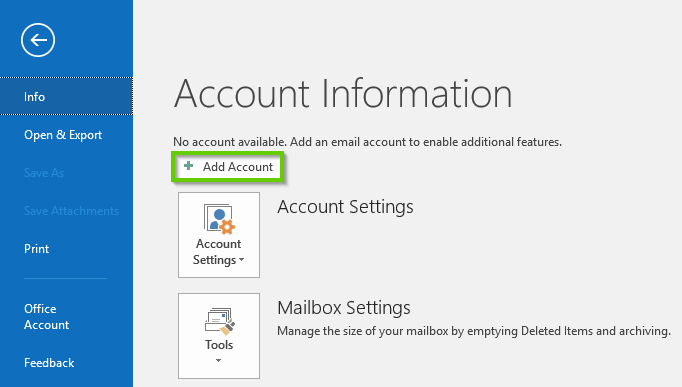
Click the File menu.
Click AddAccount.
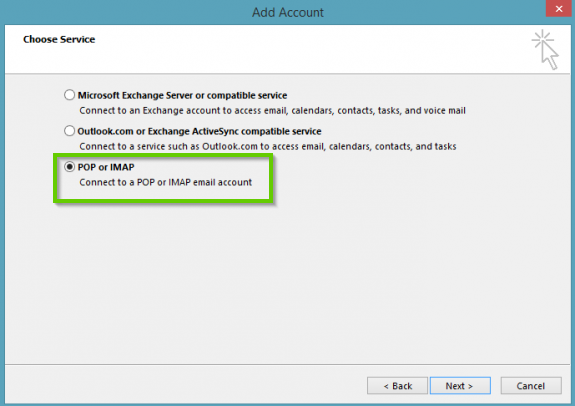
Select Manual setupor additional server types and click Next.
Select POP or IMAP. Click Next.
Within POP and IMAP Account Settings, fill out Your Name and full Email Address.
For Server Information, select IMAP for Account Type. Incoming mail server should be set to imap.comcast.net, and Outgoing mail server (SMTP) should be set to smtp.comcast.net.
Next to Logon Information, fill in your User Name and Password and put a check next to Remember password. Then click the More Settings button.
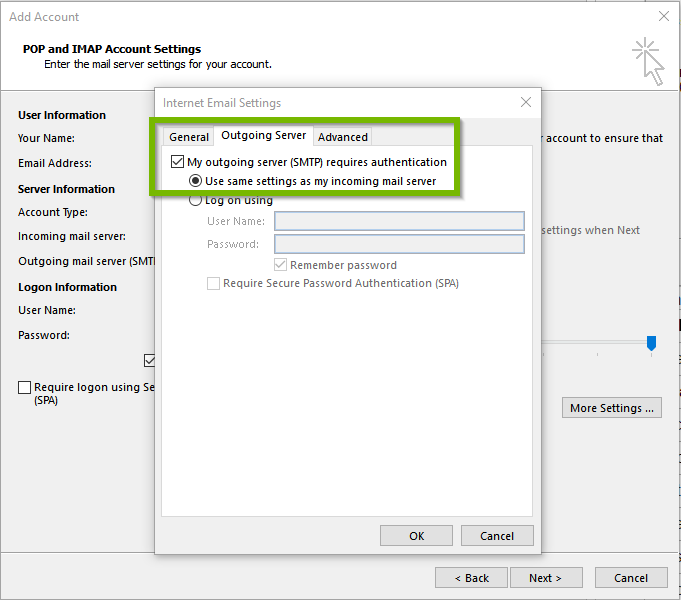
Go to the Outgoing Server tab. Enable My outgoing server (SMTP) requires authentication and Use the same settings as my incoming mail server.
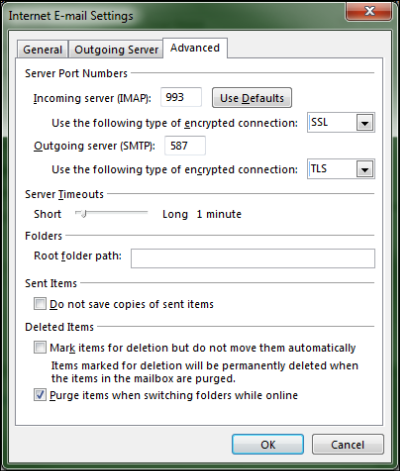
Go to the Advanced tab. For port settings, set Incoming server (IMAP) to 993 with SSL encryption, then set Outgoing server (SMTP) to 587 with TLS encryption.
Click OK then Next when finished.
Click Close if the account logs in properly.
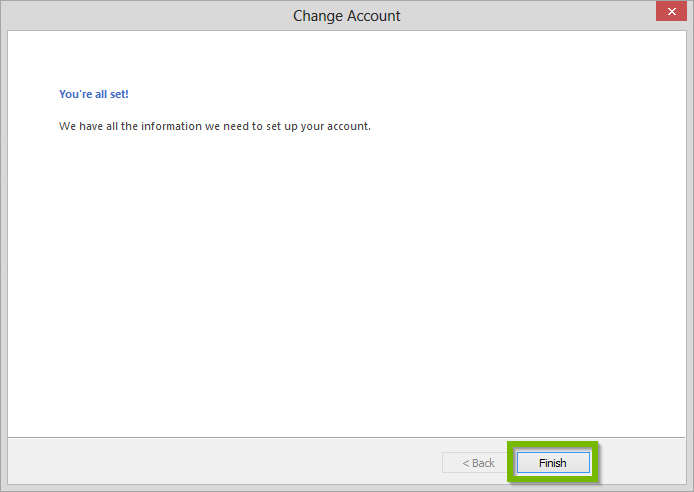
Click Finish.
11. Comcast Email Setup for Outlook 2016 (POP3)
POP is not recommended for the following reasons:
You have to delete or file the same email on every device.
Logging into each device, you will see lots of unread emails with no indication of which you deleted, read, flagged or filed.
Any folders you created and organize on one device won't be replicated on the other devices.
It is strongly recommended that you use IMAP. IMAP allows you to store their email on remote servers. This two-way protocol also allows you to synchronize your email among multiple devices, which is extremely important today, when most people have at least two devices - their laptop and smartphone.
Open Outlook.
Click the File menu.
Click AddAccount.
Select Manual setupor additional server types and click Next.
Select POP or IMAP. Click Next.
Within POP and IMAP Account Settings, fill out Your Name and full Email Address.
Select POP3 for Account Type. Incoming mail server should be set to mail.comcast.net. Outgoing mail server (SMTP) should be set to smtp.comcast.net.
Next to Logon Information, fill in your User Name and Password and put a check next to Remember password. Then click the More Settings button.
Go to the Outgoing Server tab. Enable My outgoing server (SMTP) requires authentication and Use the same settings as my incoming mail server.
Go to the Advanced tab. For port settings, set Incoming server (POP3) to 995 with SSL encryption, then set Outgoing server (SMTP) to 465 with TLS encryption.
Click OK then Next when finished.
Click Close if the account logs in properly.
Click Finish.
Mail should automatically sync.
12. IMAP vs POP3
Both IMAP and POP3 are email protocols. IMAP stands for Internet Message Access Protocol. POP3 stands for Post Office Protocol.
POP was the original protocol designed to download your emails to your local drive. IMAP came later and keeps your emails on the server.
Advantages of POP
Mail is stored locally on your computer and is accessible even without internet connection.
Internet connection is needed only for sending and receiving mail.
Option to leave copy of mail on server.
Consolidate multiple email accounts and servers into one inbox.
Advantages of IMAP
Mail is stored on a remote server and accessible from multiple different locations.
An Internet connection is needed to access mail.
Faster overview as only headers are downloaded until content is explicitly requested.
Mail is automatically backed up if server is managed properly.
Saves local storage space.
Option to store mail locally.
We recommend using IMAP. It's a more modern protocol. IMAP allows you to store your email on remote servers and synchronize your email among multiple devices, which is extremely important today, when most people have at least two devices - their laptop and smartphone.
13. Comcast Email Setup for Android (IMAP)
Tap on the Email app in the Android device.
Enter your email address and password on the Account setup screen and tap Next.
Select your Account Type. In this case, your account will be IMAP.
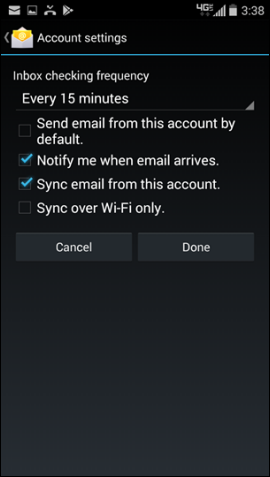
The information you entered will be verified. If the credentials are correct, you will have the option to choose some basic settings on the Account settings screen. Tap Done when finished.
Name your account (optional) and choose how you would like your name to be displayed on outgoing messages. Click Next.
Congratulations! You're done configuring your Android email client to send and receive emails from your Comcast.net email account.
14. Comcast Email Setup for Android (POP3)
Tap on the Email app in the Android device.
Enter your email address and password on the Account setup screen and tap Next.
Select your Account Type. In this case your account type is POP3.
Incoming mail server should be set to mail.comcast.net with Security set to SSL. If needed, the port is 995.
Outgoing mail server (SMTP) should be set to smtp.comcast.net with Security set to SSL. If needed, the port is 465.
The information you entered will be verified. If the credentials are correct, you will have the option to choose some basic settings on the Account settings screen. Tap Done when finished.
Name your account (optional) and choose how you would like your name to be displayed on outgoing messages. Click Next.
Congratulations! You're done configuring your Android email client to send and receive emails from your Comcast.net email account.
15. IMAP vs POP3
Both IMAP and POP3 are email protocols. IMAP stands for Internet Message Access Protocol. POP3 stands for Post Office Protocol.
POP was the original protocol designed to download your emails to your local drive. IMAP came later and keeps your emails on the server.
Advantages of POP
Mail is stored locally on your computer and is accessible even without internet connection.
Internet connection is needed only for sending and receiving mail.
Option to leave copy of mail on server.
Consolidate multiple email accounts and servers into one inbox.
Advantages of IMAP
Mail is stored on a remote server and accessible from multiple different locations.
An Internet connection is needed to access mail.
Faster overview as only headers are downloaded until content is explicitly requested.
Mail is automatically backed up if server is managed properly.
Saves local storage space.
Option to store mail locally.
We recommend using IMAP. It's a more modern protocol. IMAP allows you to store your email on remote servers and synchronize your email among multiple devices, which is extremely important today, when most people have at least two devices - their laptop and smartphone.
16. Comcast Email Setup for iOS (IMAP)
Select Settings.
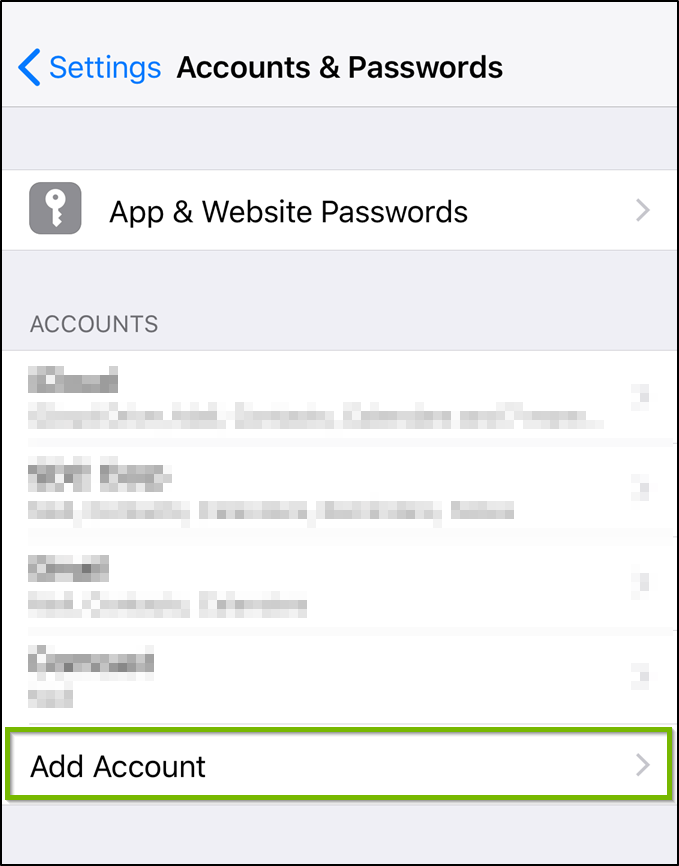
Select Accounts & Passwords.
Select Add Account.
Select Other.
Select Add Mail Account to proceed.
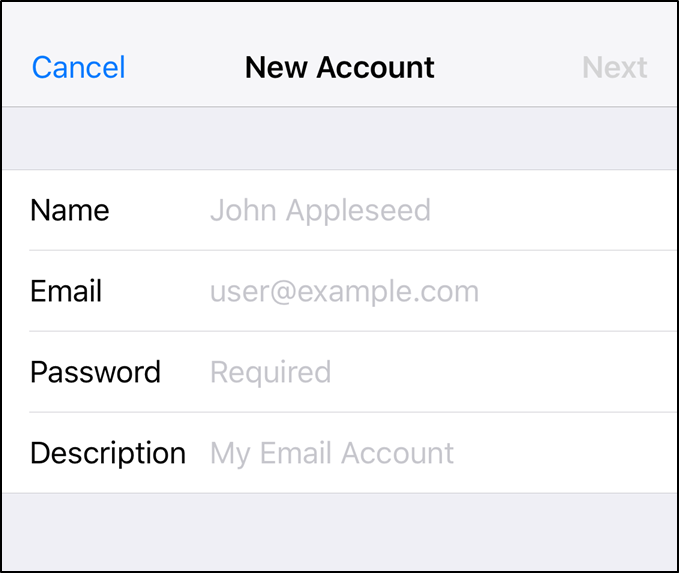
You will be presented with the New Account screen. Fill in your full name, the email address you wish to gain access to and the associated password. Account description will automatically be filled in for you.
Select Next to proceed.
Your iOS device will attempt to access your Email account using the information you provided.
Once the account is verified, you will be presented with slider buttons to select what available options you would like to have synchronized with this account. Default options will have already been selected. Select Save to proceed.
Once the account has been successfully added, this screen will display an Account Added message. Account setup has been successfully completed.
17. Comcast Email Setup for iOS (POP3)
Select Settings.
Select Accounts & Passwords.
Select Add Account.
Select Other.
Select Add Mail Account to proceed.
You will be presented with the New Account screen. Fill in your full name, the email address you wish to gain access to and the associated password. Account description will automatically be filled in for you.
Select Next to proceed.
Your iOS device will attempt to access your Email account using the information you provided.
Once the account is verified, you will be presented with slider buttons to select what available options you would like to have synchronized with this account. Tap POP.
Fill in the host information with the following: Incoming Host Namemail.comcast.net Incoming Host Port995Outgoing Host Name (SMTP)smtp.comcast.netOutgoing Host Port465SecuritySSL
Select Save to proceed.
Once the account has been successfully added, this screen will display an Account Added message. Account setup has been successfully completed.
.png)