CHA/V 3.0 User Guide
Under the hood, CHA/V 3.0 was almost a complete re-design. Every circuit trace was rerouted in an effort to minimize cross-talk and clean up the signal.
It’s still an unruly little beast, but it’s slightly more tameable now.
CHA/V 2.0 User Guide is still relevant to 95% of its functionality, so yeah, use that. The only major difference is outlined below:
3.5mm Jacks
If you built a CHA/V 3.0 using the old method (with the little red VGA test signal generators), guess what? You basically built a CHA/V 2.0, and you can just follow the 2.0 guide verbatim.
If you built a CHA/V & VGA4EVA sandwich (recommended) then the 2.0 guide still pertains, the only differences being:
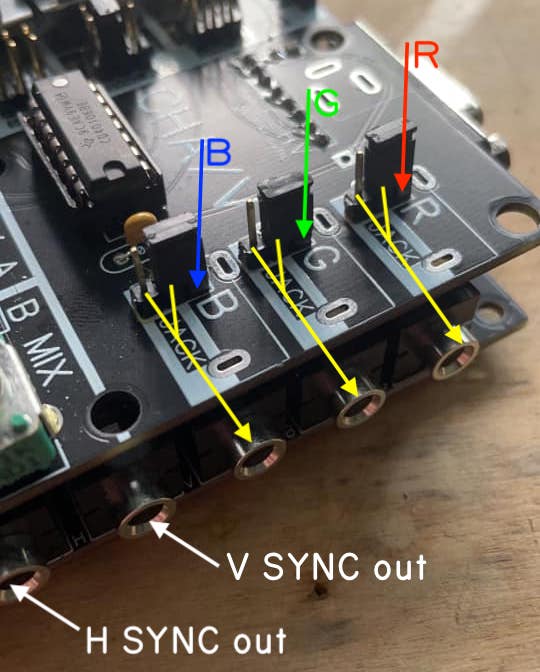
- There are now permanent, dedicated jacks for H sync and V sync (output only).
- The jacks reside on VGA4EVA, and the headers have moved to a more convenient and intuitive location.

As with the 2.0, 3.0 has three assignable jacks. Without jumpers, they aren’t connected to anything. The picture above shows a convenient jumper configuration that connects each of the assignable jacks directly to a corresponding VGA color pin. In this way, they can function as inputs (send a hot enough signal in and you’ll see some signal on that color) OR outputs (connect the jack to an amplified speaker and you’ll hear whatever signal is present on that color). While jumpered like the above pic, there’s an extra jack pin that allows you to simultaneously patch the jacks to something else too.
Again, the 2.0 manual still mostly applies, even to the jacks — the headers have just moved.
