Working with db direct internet - Deutsche Bank
Working with db direct internet - Deutsche Bank
Working with db direct internet - Deutsche Bank

You also want an ePaper? Increase the reach of your titles
YUMPU automatically turns print PDFs into web optimized ePapers that Google loves.
<strong>Working</strong> <strong>with</strong><strong>db</strong> <strong>direct</strong> <strong>internet</strong>You are working <strong>with</strong> a new onlinebanking application: <strong>db</strong> <strong>direct</strong> <strong>internet</strong>. In certainrespects, this may be different from what you are used to. In order to simplify mattersfor you, we have made a list of the most frequently asked questions aboutday-to-day banking practice.Before you get started, watch the instruction demos at www.deutschebank.nl/onlinebanking under <strong>db</strong> <strong>direct</strong> <strong>internet</strong>. A brief and easy-to-follow instruction video isavailable for each of the following topics:IntroductionViewing account informationRequesting reportsPerforming transactionsImporting paymentsThere are also several instruction videos for the User Administration module.Where to go for:Questions about status of payments:Requesting new banking products:Requesting new Digipas:Technical user questions:More information about functionality:Service Desk<strong>Deutsche</strong> <strong>Bank</strong> contact personService DeskService Deskwww.deutschebank.nl/onlinebankingService Desk <strong>db</strong> <strong>direct</strong> <strong>internet</strong>Service Desk Amsterdam: +31 (0)20 555 49 60Service Desk Eindhoven: +31 (0)40 798 35 20Opening hours: Workdays from 08.00 tot 17.30 hours2
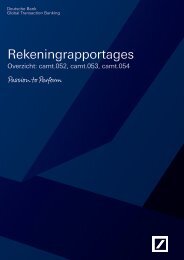
Login tipsCheck whether you are using the correct Digipas. Your User ID and PIN code arelinked to your own personal Digipas. You can recognize your Digipas by the serialnumber on the back; this serial number also appears on the letter you received <strong>with</strong>your PIN code for activating the Digipas. After activating, put a sticker <strong>with</strong> yourname on your Digipas right away.Activate your Digipas. Followthe steps given in the instructionmanual accompanyingyour Digipas. You will not beable to use the Digipas togenerate login codes andsignatures until it has beenactivated.Follow the steps below to log in:1. Select the applicable language codeThis is only required the first time you log in; the computer will remember yourpreference the next time.Serial numberContact the Service Desk in the event of:— A misplaced Digipas.— A blocked Digipas.— No Digipas has been received.— The letter containing the User ID and/or PIN code for the Digipas has been misplaced.3
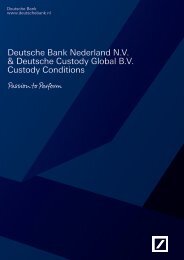
Login tips2. Change the registration modeYou only need to do this the first time you log in; the computer will remember yourpreference.4. Have your Digipas generate a Secure PIN (login code) for logging in.1. Switch on the Digipas. Hold the pressed down and, <strong>with</strong> your other finger, press ON .2. Enter your personal PIN code. If you make an error, press to delete the numbersentered.3. Once ‘SELECT’ appears on the display of your Digipas, press ‘logon’ 1 . YourDigipas will now generate an 8-digit code. Enter this code on your computer.Change the login modein DigipasEnter the login codegenerated by yourDigipas here3. Enter your user IDYou can find your User ID in the letter you received <strong>with</strong> your PIN code. The User IDmust be entered every time you log in. Make sure your User ID always ends <strong>with</strong> .eu.Next, press ‘Submit’ and the page ‘My Services’ will appear.Your user ID ending <strong>with</strong> .eu4
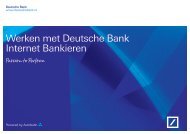
Navigating on the <strong>db</strong> <strong>direct</strong> <strong>internet</strong> start page2.3.4.1.1. Menu <strong>with</strong> the following main functions:Information Services: viewing your accountsTransaction Services: paymentsImport/Export Services: importing files for batch payments2. Particulars of the user logged in.3. Changing the language setting (during your session).4. Orders for which an action is required: Clicking on the number following the message takes you to the ‘Review instructions’ screen.6
Payment tipsYou can use the item ‘Transaction Services’ on the left menu to enter payments. You can see the options on the menu. In this example, a domesticpayment is made and the menu item ‘Domestic Payments Single’ has been selected.1.2.4.3.Select:1. The name of the account to bedebited2. The name of the charge account3. The payment mode4. Click on ‘Continue’5. Type in all the required informationand click on ‘Ready for authorization’or, if you are not ready forauthorization yet, click on one ofthe other options5.7
Payment tips:checking the statusof payment ordersTo view all your payment orders, select ‘Transaction Services’ on the left menuand then ‘View’.Payment tips:account statementsIn the left menu, select ‘Information Services’ and then ‘Account Statements’ to accessall information concerning the account.One of the following statuses appears for each payment order:PA – Payment Acknowledged – Accepted by the host for processing at the bank;PE – Pending Authorization – Awaiting authorization;PK – Partly rejected – Some payments in the batch have not been processed;PR – Pending Receipt – Awaiting processing, the host is validating the payment;RE – Rejected – File has been rejected.Some statuses can be clicked on; they then show more information, for examplethe reason for rejection (RE).(3)Under ‘Account Statements’ you can view the statements you want.1. Select a company2. Select the correct account number3. Select the start and end dates of the statement4. Click on ‘Submit’9
Report tipsRequest report <strong>direct</strong>ly2. Select the report type you want to add (MT940/MT950 in this example).Go to ‘Account Information Reports’ under ‘Information Services’ to request areport <strong>direct</strong>ly.Schedule a report3. On the next screen, set the accounts and the times when you want to receivethe report.1. In order to schedule reports, select ‘Event & Alert Services’ on the left menu andthen ‘Schedule Files and Reports’ and then click on the ‘Add’ button.10
Tips for User AdministrationOn the page ‘My Services’, select ‘User Administration’ (Customer Self Administration) under ‘Your <strong>db</strong> Services’ to create users and manage user permissions.The following instruction demos for working <strong>with</strong> User Administration are available at www.deutschebank.nl/onlinebanking under ‘<strong>db</strong> <strong>direct</strong> <strong>internet</strong>’.IntroductionCreating usersChanging user informationSetting authoritiesJoint authorization limitsSetting up authorization rolesCreating a passwordCreating reports11851e - Aug. 2012
<strong>Deutsche</strong> <strong>Bank</strong> Nederland N.V.De Entree 99-1971101 HE AmsterdamPO Box 127971100 AT AmsterdamChamber of Commerce: trade registernumber 34302014,having its registered office in AmsterdamThis brochure is for information purposes only and is designed to serve as a general overview regarding the services of <strong>db</strong> <strong>direct</strong> <strong>internet</strong>. The general description in this brochure relates to the <strong>db</strong> <strong>direct</strong> <strong>internet</strong> services offered to customers as of April 2012, which may be subject tochange in the future. This brochure and the general description of the services of <strong>db</strong> <strong>direct</strong> <strong>internet</strong> are in their nature only illustrative and do not therefore contain or cannot result in any contractual or non-contractual obligation or liability of <strong>Deutsche</strong> <strong>Bank</strong> AG or any of its affiliates.Copyright© April 2012 <strong>Deutsche</strong> <strong>Bank</strong> AG. All rights reserved.