Using WebVPN.childrens.harvard.edu - Children's Hospital Boston
Using WebVPN.childrens.harvard.edu - Children's Hospital Boston
Using WebVPN.childrens.harvard.edu - Children's Hospital Boston

Transform your PDFs into Flipbooks and boost your revenue!
Leverage SEO-optimized Flipbooks, powerful backlinks, and multimedia content to professionally showcase your products and significantly increase your reach.
<strong>Using</strong> <strong>WebVPN</strong>.<strong>childrens</strong>.<strong>harvard</strong>.<strong>edu</strong><br />
Accessing <strong>WebVPN</strong>.<strong>childrens</strong><br />
<strong>Using</strong> <strong>WebVPN</strong>.<strong>childrens</strong><br />
Connecting to your shared drives<br />
Accessing your e-mail<br />
Accessing <strong>Hospital</strong> applications<br />
Accessing PowerChart, Epic, and<br />
other Citrix applications<br />
Accessing Synapse<br />
About printing<br />
Logging out<br />
Getting more help<br />
About <strong>WebVPN</strong>.<strong>childrens</strong><br />
Use <strong>WebVPN</strong>.<strong>childrens</strong>.<strong>harvard</strong>.<strong>edu</strong> (<strong>WebVPN</strong>) to<br />
connect to the Children’s network remotely. You can<br />
use <strong>WebVPN</strong> to access certain applications and<br />
servers while you are working remotely. The five<br />
main types of connections you can access are:<br />
• Web bookmarks: Access internal resources<br />
remotely including Web2 and CHMenu.<br />
• Windows file shares: Access Windows file<br />
shares from a Web interface; folders and files<br />
appear as links.<br />
• Terminal sessions: Access text-based connections<br />
such as telnet.<br />
• Citrix NFuse: Access Citrix applications<br />
• Other Applications: Access several common<br />
Children’s applications including Synapse and<br />
Budget Account 3 (BA3)<br />
System requirements<br />
To use <strong>WebVPN</strong>, you must have the following:<br />
• an active Internet connection<br />
• a SecurID card with VPN privileges or a registered<br />
grid card<br />
1/09<br />
Contents<br />
About Children’s Web-based VPN<br />
clients<br />
There are two Children’s Web-based VPN clients:<br />
• <strong>WebVPN</strong>.<strong>childrens</strong>.<strong>harvard</strong>.<strong>edu</strong><br />
• Vpn.<strong>childrens</strong>.<strong>harvard</strong>.<strong>edu</strong><br />
You can use either to access the <strong>Hospital</strong>’s internal<br />
network from a remote location.<br />
• <strong>WebVPN</strong> is menu-based and Children’s applications<br />
are accessed from links on the <strong>WebVPN</strong><br />
home page.<br />
• Vpn.<strong>childrens</strong> is the Web-based full client. You<br />
access files and drives much the same way you<br />
do from work. To learn more about <strong>WebVPN</strong>,<br />
see the Vpn.<strong>childrens</strong> user’s guide in the eHelp<br />
section of the Internal Web page.<br />
Accessing <strong>WebVPN</strong><br />
You access <strong>WebVPN</strong> with either a SecurID card or<br />
a Grid card. To access <strong>WebVPN</strong>, follow these steps:<br />
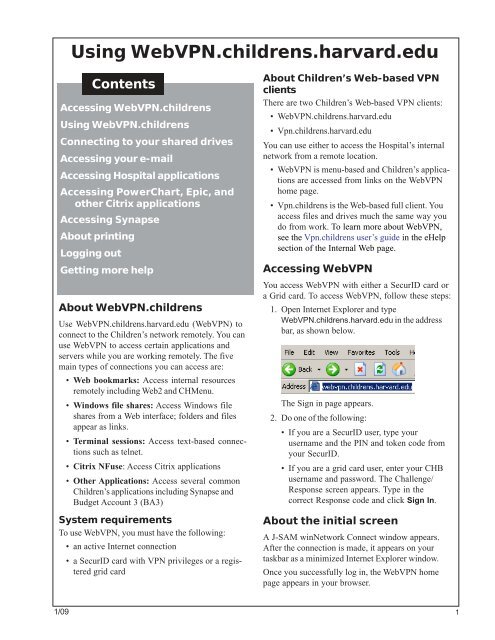
1. Open Internet Explorer and type<br />
<strong>WebVPN</strong>.<strong>childrens</strong>.<strong>harvard</strong>.<strong>edu</strong> in the address<br />
bar, as shown below.<br />
The Sign in page appears.<br />
2. Do one of the following:<br />
• If you are a SecurID user, type your<br />
username and the PIN and token code from<br />
your SecurID.<br />
• If you are a grid card user, enter your CHB<br />
username and password. The Challenge/<br />
Response screen appears. Type in the<br />
correct Response code and click Sign In.<br />
About the initial screen<br />
A J-SAM winNetwork Connect window appears.<br />
After the connection is made, it appears on your<br />
taskbar as a minimized Internet Explorer window.<br />
Once you successfully log in, the <strong>WebVPN</strong> home<br />
page appears in your browser.<br />
1
LM<br />
About the J-SAM window<br />
The J-SAM window briefly appears on your screen<br />
before minimizing as an Internet Explorer session in<br />
your taskbar. This session must remain open. If you<br />
close this minimized window, your VPN connection<br />
will discontinue.<br />
Note: When you use <strong>WebVPN</strong> two Internet<br />
Explorer windows open. One is the J-SAM<br />
window; the other is the <strong>WebVPN</strong> home<br />
page.<br />
To open a new browser window<br />
You can use the J-SAM window to open an new<br />
browser window if you accidentally close your<br />
<strong>WebVPN</strong> home page. Follow these steps:<br />
1. Click the minimized J-SAM window in your<br />
taskbar.<br />
Note: The minimized J-Sam window is the one that<br />
will read: <strong>WebVPN</strong>.<strong>childrens</strong>.<strong>harvard</strong>.<strong>edu</strong><br />
-DO NOT CLOSE - Secure Application<br />
Manage when you hover your mouse over<br />
the minimized window.<br />
2. Click the New Window link. The CHB Internal<br />
Webpage appears in a new browser window.<br />
<strong>Using</strong> <strong>WebVPN</strong><br />
The <strong>WebVPN</strong> toolbar appears at the top of the page.<br />
Use this toolbar to navigate the <strong>WebVPN</strong> menu<br />
page.<br />
To return to the <strong>WebVPN</strong> home page<br />
Do one of the following:<br />
• If you have closed the <strong>WebVPN</strong> home page<br />
window, follow the steps for opening a new<br />
browser window. Click . The <strong>WebVPN</strong><br />
home page appears.<br />
• If you have not closed the <strong>WebVPN</strong> home<br />
page, click . The <strong>WebVPN</strong> home page<br />
appears.<br />
To navigate using the Browse field<br />
Use the Browse field to navigate to a variety of<br />
resources through your VPN session.<br />
You can use the Browse field in any of the following<br />
ways:<br />
• To browse a Website, such as the CDC while<br />
retaining the <strong>WebVPN</strong> toolbar, enter a Website<br />
such as http://www.cdc.gov/ in the Browse field<br />
and click Browse.<br />
Note: To create a permanent link to a Website, see<br />
Acessing Websites.<br />
• To browse a Shared drive, type the path to the<br />
Share, such as \\ISD_team\ISD_share and click<br />
Browse. Enter you Children’s username and
password when prompted. Your shared drive<br />
appears.<br />
Note: To create a permanent link to your share, see<br />
About connecting to your shared drives.<br />
• To access a telnet application like Labs, type the<br />
fully qualified name of the telnet application, for<br />
example, hub.tch.<strong>harvard</strong>.<strong>edu</strong> and click Browse.<br />
Note: To create a permanent link to telnet computer,<br />
see <strong>Using</strong> terminal sessions.<br />
• To open a Remote Desktop session, type: rdp://<br />
. For example, type:<br />
rdp://PVTWXPG12345.<br />
Note: For more information and to create a permanent<br />
link to your host computer, see Connecting<br />
remotely.<br />
To sign out of your session<br />
You must always sign out of your session before you<br />
exit <strong>WebVPN</strong>. To sign out, click . The Signout<br />
Page appears.<br />
Accessing Web sites<br />
Use the <strong>WebVPN</strong> home page to create links to<br />
frequently accessed Websites. You can use the<br />
<strong>WebVPN</strong> home page to access Websites and to<br />
create bookmarks to Websites<br />
To access a Website<br />
To access a Website, follow these steps:<br />
1. Do one of the following:<br />
• Click to access the <strong>WebVPN</strong> home<br />
page.<br />
• Maximize the J-Sam window and click the<br />
New Window link to access the <strong>WebVPN</strong><br />
home page.<br />
2. In the Web Bookmarks section, click the name<br />
of the Website to access. The page appears.<br />
To bookmark Websites<br />
To create a bookmark to Website, follow these<br />
steps:<br />
1. Access the <strong>WebVPN</strong> home page.<br />
2. In the Web Bookmarks section, click . The<br />
Add Web Bookmark page appears.<br />
3. In the BookMark name field, enter a name for<br />
your bookmark, for example CDC home page.<br />
4. In the URL field, enter the URL of your<br />
bookmark, for example www.cdc.gov.<br />
5. In the Display Options section, you may click<br />
the Open bookmark in a new window<br />
checkbox to force the bookmark to open in a<br />
new window.<br />
Note: Once you check the Open in a New Window<br />
box, the Do not display the Web browser’s<br />
URL address bar and Do not display the<br />
Web browser’s menu and the toolbar<br />
buttons are automatically checked. Checking<br />
these boxes prevents you from using features<br />
that might compromise your secure<br />
VPN session.<br />
6. Click . The <strong>WebVPN</strong><br />
home page reappears and your bookmark is<br />
added to the Web bookmarks section.<br />
To edit your bookmark<br />
To edit your bookmark, follow these steps:<br />
1. Access the <strong>WebVPN</strong> home page.<br />
2. In the Web Bookmarks section, find the bookmark<br />
to edit and click . The Edit Bookmark<br />
page appears.<br />
3. Make your changes and click<br />
.<br />
To delete a bookmark<br />
To delete a bookmark, follow these steps:<br />
1. Access the <strong>WebVPN</strong> home page.<br />
2. In the Web Bookmarks section, find the bookmark<br />
to delete and click . Your bookmark is<br />
deleted.<br />
Note: You can only delete bookmarks you create.<br />
You cannot delete the default bookmarks that<br />
appear on the home page.<br />
To sort your bookmarks<br />
You can change the order that your book marks<br />
appear. For example, have your personal bookmarks<br />
appear before permanent bookmarks. To sort your<br />
bookmarks, follow these steps:<br />
1. Access the <strong>WebVPN</strong> home page.<br />
2 In the In the Web Bookmarks section, click<br />
. The Panel Preferences page appears.<br />
3
LM<br />
3. Do one of the following:<br />
• To change the position of the bookmark, click<br />
or .<br />
• To sort your bookmarks alphabetically, click<br />
.<br />
• To have your personal bookmarks appears<br />
before permanent bookmarks, check the<br />
Display my web bookmarks before the<br />
permanent web bookmarks checkbox.<br />
4. Click .<br />
About connecting to your<br />
shared drives<br />
You can either browse to your shared drive or<br />
bookmark it.<br />
Note: For more information on browsing to your<br />
shared drive see To navigate using the<br />
Browse field.<br />
When you bookmark your shared drive, it appears on<br />
your <strong>WebVPN</strong> home page.<br />
Bookmarking a folder on your<br />
shared drive<br />
To bookmark a folder on your shared drive, follow<br />
these steps:<br />
1. Access the <strong>WebVPN</strong> home page.<br />
2. In the Files section, click .<br />
3. A list of domains appears. Click the domain to<br />
select, for example CH<strong>Boston</strong>.<br />
4. A list of servers appears. Click the name of the<br />
server to select, for example ISDTeam.<br />
5. If it is a secured server, the following window<br />
appears. Type you CH<strong>Boston</strong> username and<br />
password.<br />
Note: If your domain is other than CH<strong>Boston</strong>, you<br />
need to specify your domain name in the<br />
format: domainname\username. For example,<br />
Cardio\forbes_k. There are no spaces<br />
between the domain name, backslash(\), and<br />
your username.<br />
6. A list of shared drives appears. Click the share<br />
to select.<br />
7. A list of folders appears. Check the box before<br />
the folder to bookmark and click<br />
.<br />
8. The Add Bookmark page appears, click<br />
.<br />
The <strong>WebVPN</strong> home page reappears and your<br />
shared drive is bookmarked.<br />
To access the entire shared drive instead<br />
of just one file<br />
If you want to access a group of files on your shared<br />
drive instead of just one, you must edit your bookmark.<br />
To edit your bookmark, follow these steps:<br />
1. Click next to the bookmarked file on your<br />
shared drive that you just created.<br />
2. In the Bookmark Name, enter a name for your<br />
bookmark, such as ISDShare.<br />
3. In the Path field, delete everything after the last<br />
backslash. For example, if the path is<br />
\\TestTeam\TestShare\MyFile delete the words<br />
MyFile.<br />
4. Click .<br />
8. Click to close the window.<br />
Overwriting files while you upload<br />
If you are uploading a file with the same name as a<br />
file that already exists in the folder, the new file is<br />
renamed with the date and time of the upload. For<br />
example MyDoc.doc becomes MyDoc-02-19-2009-<br />
16-00.doc. To replace the original file instead of<br />
creating a copy, use the Save As field. To overwrite<br />
a file, follow these steps:<br />
1. Access your shared drive.<br />
2. Click . The Upload Files
Connecting to your P: drive<br />
You must know your usergroup to connect to your P:<br />
Drive. See Determining your usergroup.<br />
To connect to your P: drive, follow these steps:<br />
1. Access the <strong>WebVPN</strong> home page.<br />
2. In the Files section, click .<br />
3. In the Browse field, enter<br />
\\YOURUSERGROUP\username$. For<br />
example, \\chfsuser1\forbes_k$, as shown<br />
below.<br />
4. Click . Your P: drive appears.<br />
5. Click . The Add Windows<br />
Bookmark page appears.<br />
6. You may enter an easy-to-remember name in<br />
the Bookmark Name field, such as My P:Drive.<br />
7. Click .<br />
Determining your usergroup<br />
Your usergroup is based on your username. Use the<br />
table below to determine your usergroup.<br />
<strong>Using</strong> terminal services<br />
Use terminal sessions to connect to remotely to<br />
another computer or to access legacy applications<br />
such as LABs. For information about accessing<br />
LABS from <strong>WebVPN</strong>.<strong>childrens</strong> contact the Help<br />
Desk<br />
To connect remotely to another computer<br />
You can connect remotely to another computer, such<br />
as your primary work computer.<br />
Note: To connect remotely to another computer, you<br />
must have Remote Desktop User access. To<br />
request Remote Desktop User access,<br />
contact the HelpDesk.<br />
To connect remotely to another computer, follow<br />
these steps:<br />
1. Access the <strong>WebVPN</strong> home page.<br />
2. Click . The Add Windows Terminal Services<br />
Session page appears.<br />
3. In the Session Type field, select Windows<br />
Terminal Services, as shown below.<br />
4. In the Bookmark Name field, enter a name for<br />
your session, for example Work Computer.<br />
Note: This name appears on your <strong>WebVPN</strong> home<br />
page.<br />
5. In the Host field, enter the name of the computer<br />
you are trying to access remotely, for<br />
example PVTWXPG12345.<br />
Note: For information about finding the name of<br />
your computer, see <strong>Using</strong> Remote Desktop.<br />
6. Click .<br />
To add a Terminal Session<br />
You can add a terminal session to connect to telnet<br />
applications. Before you can add a Terminal Session<br />
you will have to know the Host Name or IP address<br />
of the telnet or SSH application. To add a Terminal<br />
Session, follow these steps:<br />
1. Access the <strong>WebVPN</strong> home page.<br />
2. Click . The Add Windows Terminal Services<br />
Session page appears.<br />
3. In the Session Type field, select the appropriate<br />
Services. For example, select Telnet to add a<br />
Children’s HUB application.<br />
5
4. In the Bookmark Name field, enter a name for<br />
your session, for example LABS.<br />
Note: This name appears on your <strong>WebVPN</strong> home<br />
page.<br />
5. In the Host field, enter the ip address or<br />
hostname of the application to access, for<br />
example hub.tch.<strong>harvard</strong>.<strong>edu</strong>.<br />
LM<br />
6. Click .<br />
To start a terminal service<br />
The terminal service opens in another window. You<br />
will have to log into the service with your CHB<br />
username and password. To start a terminal service,<br />
follow these steps:<br />
1. Access the <strong>WebVPN</strong> home page.<br />
2. In the Terminal Services section, click name of<br />
the service to start.<br />
3. A Terminal Services session starts. Log in with<br />
your CHB username and password.<br />
4. When you are finished with your session, click<br />
to end your session and close the<br />
window.<br />
Accessing your e-mail<br />
You can use either Outlook Anywhere or OWA<br />
when connected to <strong>WebVPN</strong>.<strong>childrens</strong>.<br />
To use Outlook Anywhere<br />
To use Outlook Anywhere, follow these steps:<br />
1. To prevent any data corruption, close Outlook<br />
Anywhere before you connect to<br />
<strong>WebVPN</strong>.<strong>childrens</strong>.<br />
2. After your <strong>WebVPN</strong> session is active, open<br />
Outlook Anywhere.<br />
Note: For more information about Outlook Anywhere,<br />
see the eHelp page.<br />
To use OWA<br />
To use OWA, follow these steps:<br />
1. Access the <strong>WebVPN</strong> home page.<br />
2. In the Web bookmarks section, click the<br />
Outlook Web Access link.<br />
3. Log in using your CHB username and password.<br />
Accessing <strong>Hospital</strong> applications<br />
You can access <strong>Hospital</strong> applications such as<br />
PowerChart, Epic and Synapse.<br />
Accessing PowerChart, Epic, and<br />
other Citrix applications<br />
Use the Citrix NFuse Portal to access PowerChart,<br />
Epic and other Citrix applications while connected to<br />
<strong>WebVPN</strong>.<strong>childrens</strong>.<br />
1. Access the <strong>WebVPN</strong> home page<br />
2. In the Web Bookmarks section, click the Citrix<br />
NFuse Portal link.<br />
3. The CHB Citrix page appears.<br />
4. Enter your CHB username and password and<br />
click . The list of Citrix applications<br />
that you have access to appears.<br />
5. When you have completed your work, click<br />
Logging out<br />
Always log out of your <strong>WebVPN</strong> session when you<br />
are done. To log out, do one of the following:<br />
• From the <strong>WebVPN</strong> home page, click .<br />
• Maximize the JSAM window, click End Session.<br />
A warning message appears. Click Yes to close<br />
your session.<br />
Getting more help<br />
If you need help using<br />
<strong>WebVPN</strong>.<strong>childrens</strong>.<strong>harvard</strong>.<strong>edu</strong>, use the Remedy<br />
Web form to contact the HelpDesk, or send an email<br />
to help.desk@<strong>childrens</strong>.<strong>harvard</strong>.<strong>edu</strong> or call extension<br />
5-4357 (5-Help).<br />
.