


This JUnit Tests Tutorial will focus on how to Write JUnit Tests in Eclipse, Test Output, and JUnit 4 Test Case Example in Java Eclipse:
We will cover the following topics:
- The navigational workflow of creating a test case in Eclipse.
- How does an auto-created basic template of JUnit test case look like?
- A couple of examples on JUnit 4 basic test cases and trying to interpret the code.
- Simultaneously, we will also cover all about the resultant console window and how to save the failed tests along with their stack traces for future reference.
=> Take A Look At The JUnit Beginners Guide Here.

Table of Contents:
Create JUnit Tests In Eclipse
Let’s begin creating the JUnit test in Eclipse.
#1) Open Eclipse
#2) Create a Project folder through the navigation flow: File->New->Java Project. Another window opens up where the user needs to enter the Project folder name. The screenshot is given below.
#3) You may set the default workspace path by checking the checkbox Use default location or may uncheck it to set a different path. This will be the path where all your project files – your java class files, JUnit class files or TestNG class files would be stored along with its report, log files, and test data files if any.
#4) The JRE environment is also set by default. However, do check if the JRE configured is correct.
#5) Click the Finish button at the bottom of the dialog box.

#6) With this, the Project folder with the name gets added in the project explorer as shown below.

#7) Now let us see how to add a new JUNIT Testcase into the project folder. Select Project folder => src folder => Right-click on the src folder => Select New => Junit Test Case.

#8) A window opens up, where you can enter the following:
- Select the source folder path in the Source folder.
- Enter the package name. If the package name is not entered, the files go under the default package that is usually not encouraged or in other words, not a good coding practice to follow.
- Enter the JUnit class name.
- There are few stub methods: setUpBeforeClass(), tearDownAfterClass(), setUp(), teardown(). In case, you need a ready template of these methods added, then you may check the respective checkbox.
- Click the Finish button.

Below is the default template of the class file that gets generated:

JUnit 4 Test – Basic Examples
Let’s now begin with the creation of a basic JUnit 4 test.
Under the package demo. tests, we have created a JUnit test class file and have included a method test_JUnit() that verifies if the str1 variable and string passed in the condition are both equal. The comparison of the expected condition has been performed by the assertEquals() method which is a JUnit specific method.
We will discuss the method along with many other methods supported by JUnit that makes it worth using it later. Besides, also observe the @Test annotation added here. @Test defines the test case in a JUnit class file.
Similarly, you may have multiple test cases in one class file by having multiple methods in place each preceded by @Test annotation. We will also discuss all the annotations supported by JUnit i.e. both JUnit 4 and JUnit 5 in our subsequent tutorials.
Example 1:
The test is supposed to Pass on executing the below code snippet as both the expected and the actual string values match.
Code:
package demo.tests;
import static org.junit.Assert.*;
import org.junit.After;
import org.junit.Before;
import org.junit.Test;
public class JUnitProgram {
	@Test
	public void test_JUnit() {
		System.out.println("This is the testcase in this class");
		String str1="This is the testcase in this class";
		assertEquals("This is the testcase in this class", str1);
	}
}
The result on console and JUnit Result Tab:
On executing the JUnit class, the console and JUnit result tab shows up,
- The Console shows as below where a message reads as ‘This is the test case in this class’.
- The JUnit result tab displays mainly the number of test cases run, number of errors and number of failures encountered i.e. Run: 1/1 (meaning 1 testcase out of 1 testcase ran), Errors: 0 (no errors found in the test case executed), Failures: 0(no test cases failed)
- The time taken to finish the execution of the tests.
- Displays a green bar if all the test cases are passed.
- Just above the timestamp on the JUnit tab, you see different icons: The first icon shows ‘Next Failed Test’, the second icon shows ‘Previous Failed Test’, and the third icon with a blue and red cross helps you to filter out only failed tests. The icon next to this is to filter only the test cases that were skipped during execution.

Example 2:
Now, let’s make a slight update to the code such that the expected string value doesn’t match the actual. The test is supposed to Fail on executing the updated code snippet as both the expected and the actual string values do not match. In the screenshot below, you can see the updated code as well as the resultant tab.
Result on console and JUnit Result Tab:
On executing the JUnit class, the console and JUnit result tab shows up the below.
#1) The Console message and timestamp under the JUnit result tab display as it was in the earlier example.
#2) The difference with this change is in the JUnit results tab. The Failures count now shows 1, with a red bar implying that the testcase has failed. Given below is a screenshot for your reference.

#3) At the bottom of the Left panel, there is a ‘Failure Trace’ tab that shows the reason why the testcase failed.
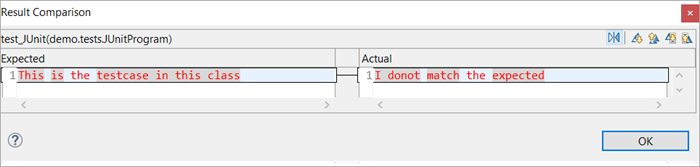
#4) When you click on the first line under the Failure Trace, a window that shows the deviation between the expected results and actual results very clearly opens up.
Screenshot of the deviation window is shown below:
Save Failed Tests And Stacktraces
- On the failed test under the JUnit result view, navigate to the Failure Trace tab, right-click and select the option ‘Copy Failure List’.
- You will be able to paste it in a notepad or word and save it for your future reference. The copy pasted content includes all the stack traces of this failed instance of the testcase along with the testcase name.

Conclusion
We covered how to create a JUnit test with an example of how does a basic JUnit test case looks like along with the know-how on the result of the test case both in situations when it fails or passes. Besides, we also learned that stack traces and the tests could be saved externally.
In our upcoming tutorial, we shall move on to Test Fixture where we will learn an approach towards setting certain precondition tests, the actual test methods, and certain postcondition tests.
=> Read Through The Easy JUnit Training Series.