Skyward Gradebook LISD Accessible from School or Home Login ...
Skyward Gradebook LISD Accessible from School or Home Login ...
Skyward Gradebook LISD Accessible from School or Home Login ...

Create successful ePaper yourself
Turn your PDF publications into a flip-book with our unique Google optimized e-Paper software.
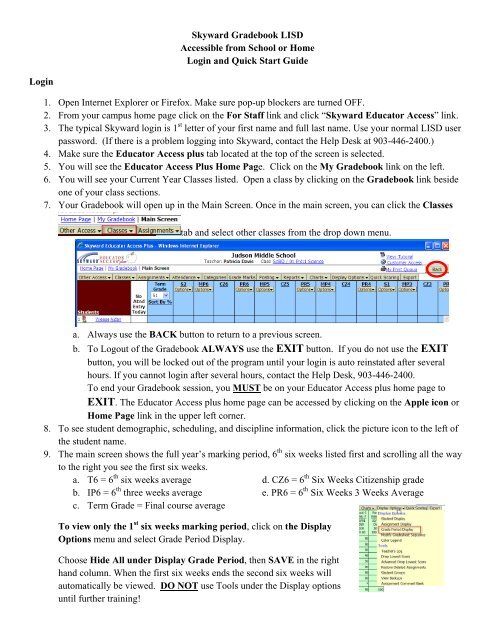
<strong>Skyward</strong> <strong>Gradebook</strong> <strong>LISD</strong><strong>Accessible</strong> <strong>from</strong> <strong>School</strong> <strong>or</strong> <strong>Home</strong><strong>Login</strong> and Quick Start Guide<strong>Login</strong>1. Open Internet Expl<strong>or</strong>er <strong>or</strong> Firefox. Make sure pop-up blockers are turned OFF.2. From your campus home page click on the F<strong>or</strong> Staff link and click “<strong>Skyward</strong> Educat<strong>or</strong> Access” link.3. The typical <strong>Skyward</strong> login is 1 st letter of your first name and full last name. Use your n<strong>or</strong>mal <strong>LISD</strong> userpassw<strong>or</strong>d. (If there is a problem logging into <strong>Skyward</strong>, contact the Help Desk at 903-446-2400.)4. Make sure the Educat<strong>or</strong> Access plus tab located at the top of the screen is selected.5. You will see the Educat<strong>or</strong> Access Plus <strong>Home</strong> Page. Click on the My <strong>Gradebook</strong> link on the left.6. You will see your Current Year Classes listed. Open a class by clicking on the <strong>Gradebook</strong> link besideone of your class sections.7. Your <strong>Gradebook</strong> will open up in the Main Screen. Once in the main screen, you can click the Classestab and select other classes <strong>from</strong> the drop down menu.a. Always use the BACK button to return to a previous screen.b. To Logout of the <strong>Gradebook</strong> ALWAYS use the EXIT button. If you do not use the EXITbutton, you will be locked out of the program until your login is auto reinstated after severalhours. If you cannot login after several hours, contact the Help Desk, 903-446-2400.To end your <strong>Gradebook</strong> session, you MUST be on your Educat<strong>or</strong> Access plus home page toEXIT. The Educat<strong>or</strong> Access plus home page can be accessed by clicking on the Apple icon <strong>or</strong><strong>Home</strong> Page link in the upper left c<strong>or</strong>ner.8. To see student demographic, scheduling, and discipline inf<strong>or</strong>mation, click the picture icon to the left ofthe student name.9. The main screen shows the full year’s marking period, 6 th six weeks listed first and scrolling all the wayto the right you see the first six weeks.a. T6 = 6 th six weeks average d. CZ6 = 6 th Six Weeks Citizenship gradeb. IP6 = 6 th three weeks average e. PR6 = 6 th Six Weeks 3 Weeks Averagec. Term Grade = Final course averageTo view only the 1 st six weeks marking period, click on the DisplayOptions menu and select Grade Period Display.Choose Hide All under Display Grade Period, then SAVE in the righthand column. When the first six weeks ends the second six weeks willautomatically be viewed. DO NOT use Tools under the Display optionsuntil further training!
To set the Student Display options, click on the Display Options menu and select Student Display.Choose <strong>from</strong> the available S<strong>or</strong>ting Options and click Save.Categ<strong>or</strong>ies/Assignments1. You MUST set the categ<strong>or</strong>ies bef<strong>or</strong>e any assignment is made. These categ<strong>or</strong>ies are set f<strong>or</strong> the entirelength of the course and cannot be changed once an assignment is added.a. To set categ<strong>or</strong>ies, click the Categ<strong>or</strong>ies Tab on the Main <strong>Gradebook</strong> Screen.b. Click the “Change Sc<strong>or</strong>e Method Button” and make sure you select “Base grades on percentsassigned to categ<strong>or</strong>ies” and click Save.c. Click the Add/Edit Categ<strong>or</strong>ies button. Bef<strong>or</strong>e selecting the categ<strong>or</strong>ies/percentages, check withyour campus administrat<strong>or</strong>/department head. (The total must be 100%.) Uncheck the categ<strong>or</strong>iesnot needed. Type the percentages in the box. Click the SAVE button, then click the Back buttonto get to your gradebook. Note: Col<strong>or</strong> of categ<strong>or</strong>ies cannot be changed.2. To add an assignment:a. Click the Assignments menu at the top of the Main <strong>Gradebook</strong>Screen and select Add Assignment.b. Select the appropriate categ<strong>or</strong>y (required) using the dropdown menu.c. Type the name of the assignment in the Description box (required). (Max of 30 characters)d. Detail Description is optional. (Max 300 characters)e. Skip the Assignment Group.f. Select the Assign date.g. Select the Proposed Date due.h. Actual Due Date optional.i. You will n<strong>or</strong>mally leave the Post to Family Access and Post to Student Access (Student Accessf<strong>or</strong> Secondary Students) options checked.j. The Max Sc<strong>or</strong>e is 100.k. Click Save and Sc<strong>or</strong>e to go directly to entering student grades, <strong>or</strong> Save and Add Another toadd another assignment without entering grades f<strong>or</strong> the assignment just entered, <strong>or</strong> Save andBack to return to the <strong>Gradebook</strong>.l. When back to the Main Screen of the <strong>Gradebook</strong>, you may enter grades by clicking on theassignment name <strong>or</strong> by clicking the Quick Sc<strong>or</strong>ing tab at the top. Remember to click the SAVEbutton often during the rec<strong>or</strong>ding of grades.m. To change any grade, click on the assignment name and select Sc<strong>or</strong>e Entry. Special codes arelisted on the right and if used must be keyed into the Special Code column. Click SAVE whenyou have finished editing. This will return you to your Main <strong>Gradebook</strong>.n. To mass assign grades, click the assignment name and select Mass AssignSc<strong>or</strong>e. To the right, fill in the inf<strong>or</strong>mation f<strong>or</strong> mass assigning a grade. Click Apply.
o. To end your <strong>Gradebook</strong> session, you MUST be on your Educat<strong>or</strong> Access plus home page toEXIT. The Educat<strong>or</strong> Access plus home page can be accessed by clicking on the Apple icon <strong>or</strong><strong>Home</strong> Page link in the upper left c<strong>or</strong>ner.To Print:To print a blank gradesheet:a. From the <strong>Gradebook</strong> main screen, click on the Rep<strong>or</strong>ts pull down menuand select Grade Sheet Rep<strong>or</strong>t in the <strong>Gradebook</strong> section.b. From the list, highlight a Blank Gradesheet template rep<strong>or</strong>t and clickPrint. Once it states completed, click the Display Rep<strong>or</strong>t button to viewand print the pdf document.To print a gradebook rep<strong>or</strong>t:a. From the <strong>Gradebook</strong> main screen, click on the Rep<strong>or</strong>ts pull down menu and select Grade SheetRep<strong>or</strong>t in the <strong>Gradebook</strong> section.b. Select Add New Templatea. Name your Template and Saveb. On the next screen, select to display assignment inf<strong>or</strong>mation f<strong>or</strong> either a specific term <strong>or</strong> a daterange.c. Select Options f<strong>or</strong> your rep<strong>or</strong>t. When complete, click Save.d. Highlight the rep<strong>or</strong>t you wish to print then click Print.e. You will see the rep<strong>or</strong>t go into a Print Queue. Once it states completed, click the Display Rep<strong>or</strong>t.f. You will see a pdf document. Click the printer icon, select your printer, and click OK. The rep<strong>or</strong>twill stay completed in the Print Queue two (2) days.g. If you return to the list of completed rep<strong>or</strong>ts within two days, you highlight the rep<strong>or</strong>t and click theView button. To print, refer to instructions above.To Take Attendance:a. Click the Attendance menu near the top of the window.b. After you take attendance, click the Save button in the top right area.A = AbsentT = TardyP = Present (Defaults to Present when Attendance opens)Automatic timeout is 15 minutes. You will have to login again. You will lose anything not saved when this happens.