
With the increase in remote working, many people need to access a Mac remotely either in the office or outside of the home.
Alternatively, you may be working away from your home or office and need to access files on your Mac from your iPad, iPhone or Windows computer.
And sometimes, you may just want to connect to a friend or relative’s Mac in order to fix or troubleshoot it remotely.
The bad news is that Apple removed the useful Back To My Mac tool from macOS Mojave onwards which made it easy to access your Mac remotely from any location.
The good news however is that there are plenty of other ways to control a Mac remotely most of which are easy enough even or beginners.
These methods work in all the latest versions of macOS including Monterey and Ventura.
Quick Navigation
How To Access A Mac Remotely
It’s important to be aware that there are two different ways of connecting to a Mac:
- Local Network (i.e. a Mac on the same network such as a WiFi or LAN). The easiest way to do this is via Remote Management management tools in macOS.
- Remotely Anywhere (i.e. a Mac anywhere in the world or in a different location). The easiest way to do this is by using remote desktop software.
You May Also Like:
- Best Remote Desktop Software For Mac
- Best Network Monitoring Software For Mac
- Best VPNs To Secure Remote Connections
- What Is a VPN & 5 Reasons To Use One on a Mac
Here then are the best ways to access and control a Mac or Windows PC remotely from another Mac, iPhone or iPad.
1. Remote Desktop Software
If you need to access to a Mac anywhere in the world or in another location we strongly recommend using remote desktop software which makes it much easier and allows you to do a lot more.
Using Remote desktop software is by far the easiest way to connect two Macs or access a Mac remotely from iPad, iPhone or a Windows PC.
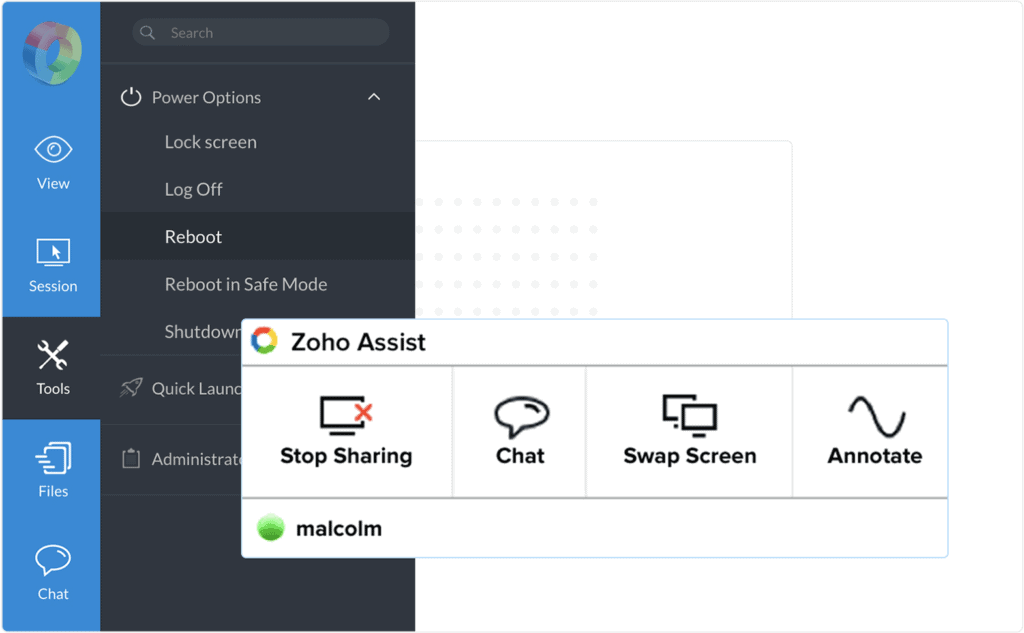
Remote Desktop software allows gives you far more options when it comes to controlling a Mac remotely including file sharing, screen sharing and remote admin of a Mac from any device including Windows PCs, iPhone or iPad.
The best Remote Desktop Software like GoToMyPC make it easy to connect to Macs, Windows PCs and mobile devices to send and receive files, share screens and manage a Mac remotely.
For remotely connecting to networks of Macs, there are also more powerful tools like GoToResolve for system administrators which allow you to remotely access and monitor entire networks of Macs and provide remote support.
Other remote desktop apps for Mac users include Zoho Assist, Royal TSX and Jump Desktop.
There’s also Apple Remote Desktop which is aimed at Enterprises that manage large networks of Macs remotely.
Remote Desktop apps do not require any technical knowledge and make it easy enough even for beginners to access a computers and devices remotely.
You can find out the best tools to use in our guide to the best remote desktop software for Mac.
2. Remote Management in macOS
If you need to access a Mac locally (i.e. on the same WiFi network, LAN or connected via a VPN) then the easiest way to access a Mac remotely is using the Remote Management tools in macOS.
Unfortunately, Apple removed Back to My Mac from macOS in Mojave onwards which used to make it easy to connect two Macs or devices to each other.
However, it has replaced it in macOS with the Remote Management feature in System Preferences. This enables your Mac to make and receive connections from other Macs and devices.
To activate Remote Management on a Mac follow these instructions:
- Go to the Apple Menu in the top left of your desktop and select System Preferences > Sharing and select Remote Management.
- You will then you will be prompted to define what you would like remote users to be able to access on your Mac.
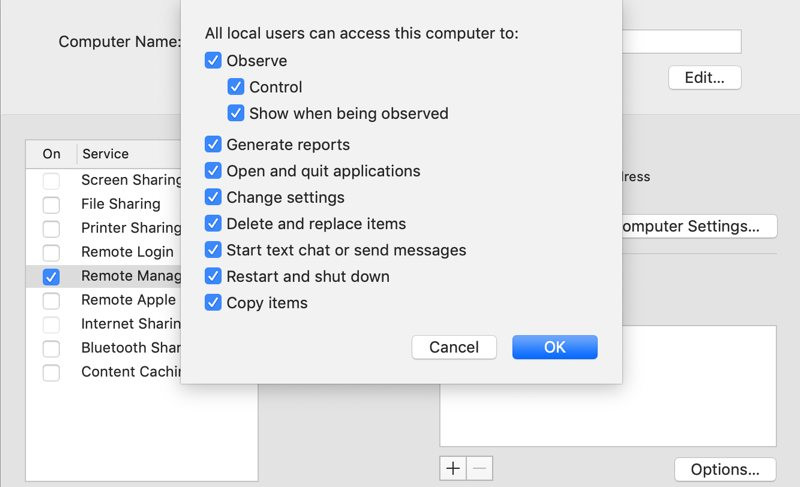
- You can also then select who has access to your Mac such as All Users (which means any Mac device on your WiFi network) or restrict access to specific users on your network which you need to designate.
3. Remote Login in macOS
The Remote Login feature in macOS is similar to Remote Management but only allows users to access a computer via SSH or SFTP.
This requires more advanced knowledge of macOS as it requires using the Terminal.
To activate remote login on a Mac follow these instructions:
- Go to the Apple Menu in the top left of your desktop and select System Preferences > Sharing and select Remote Login.
- Check the Remote Login box. You’ll see a message saying “To log into this computer remotely type: “ssh yourusername@youripaddress”.
- It’s important to take a note of both this username and IP address as it will enable other users to connect to your Mac using Terminal. You can also control the amount of access to your Mac by choosing either “All Users” (which means anyone can connect to your Mac on your network) or you can use the “+” symbol to add just one specific user to connect to.
To then access the Mac remotely you need to use Terminal which is a free command based tool in macOS.
- Search for Terminal in Spotlight and open the Terminal application in macOS.
- Type: “ssh usernameofmac@ipaddressofmac” replacing the “usernameofmac” and “ipaddressofmac” with the details you noted down earlier.
- Terminal will then indicate that you are connected to the target Mac.
Since using Terminal is very technical, you can also use a remote desktop client or third party VNC viewer to connect to your Mac using the same credentials.
Note also that the remote login feature in macOS uses secure FTP (SFTP) to connect two Macs together securely.
However, if you’re connecting to a corporate network or computer, you might want to consider using a VPN on your Mac which creates a safer more encrypted connection.
4. Screen Sharing in macOS
If you simply need to connect to another Mac to share your screen then you can use the free Screen Sharing utility in macOS.
Screen Sharing is a free utility in macOS which allows you to share your screen with another Mac or Apple device.
Despite the name, the Screen Share feature in macOS also allows you to access apps, files and folders on another Mac.
- Go to the Apple Menu in the top left of your desktop and select System Preferences > Sharing and select the option Screen Sharing.
- Search for the Screen Sharing app in Spotlight
- Enter the Apple ID of the Mac you want to connect to. If they’re in your Apple Contacts list, the name will auto-fill in blue and you can select it to enter.
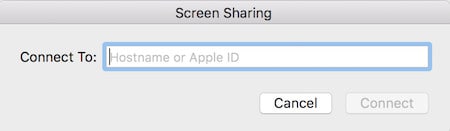
- You’ll then see a notification that your Mac is awaiting the other user to accept your connection.
- The user can define what level of permissions they want to grant you such as screen sharing only or full Remote Management (see number 5 on Remote Management below).
Although the Screen Sharing tool is very easy to use, it only works for connecting to other Apple devices, not Windows computers.
It can also be very laggy or slow at times and you’ll get better results by using a remote desktop app.
We recommend trying the excellent Screens for Mac if you want an alternative to Screen Sharing in macOS.
5. iCloud
Rather than connect to another computer, if you save all of your files in iCloud, you can access them easily from any device including a Windows PC.
Note that you need to be signed into iCloud on your Mac to do this and have an iCloud subscription.
You can’t share screens using iCloud but it’s perfect for just accessing files, emails and pretty much anything stored on a Mac or PC remotely.
Here’s how to remotely access files on a Mac or Windows PC using iCloud.
- Go to System Preferences and click on iCloud
- Make sure that Documents and Folders is checked

- Also click on Optimize Mac Storage at the bottom which makes sure that if your Mac runs out of space as you download files and folders from iCloud, it will move older documents to iCloud.
- You can now access all the documents and folders on your Mac on any device you’re signed into with the same Apple ID such as iPad, iPhone or Mac. You can also access them on a Windows PC by signing into iCloud via a browser.