DOWNLOADING Citrix ICA Web Client for 32-bit Windows (1.86 MB)
DOWNLOADING Citrix ICA Web Client for 32-bit Windows (1.86 MB)
DOWNLOADING Citrix ICA Web Client for 32-bit Windows (1.86 MB)

You also want an ePaper? Increase the reach of your titles
YUMPU automatically turns print PDFs into web optimized ePapers that Google loves.
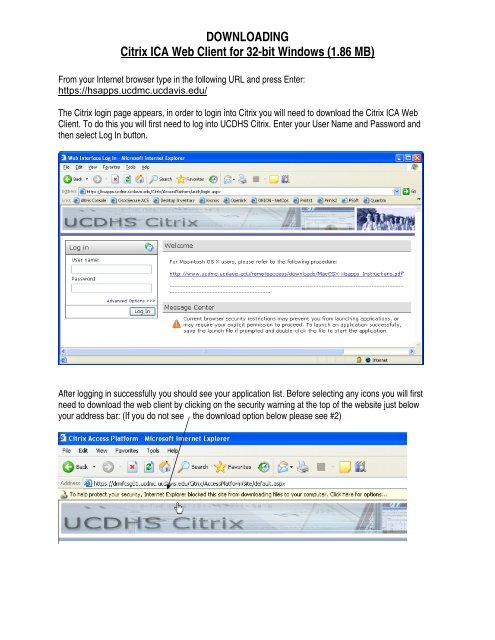
<strong>DOWNLOADING</strong><br />
<strong>Citrix</strong> <strong>ICA</strong> <strong>Web</strong> <strong>Client</strong> <strong>for</strong> <strong>32</strong>-<strong>bit</strong> <strong>Windows</strong> (<strong>1.86</strong> <strong>MB</strong>)<br />
From your Internet browser type in the following URL and press Enter:<br />
https://hsapps.ucdmc.ucdavis.edu/<br />
The <strong>Citrix</strong> login page appears, in order to login into <strong>Citrix</strong> you will need to download the <strong>Citrix</strong> <strong>ICA</strong> <strong>Web</strong><br />
<strong>Client</strong>. To do this you will first need to log into UCDHS <strong>Citrix</strong>. Enter your User Name and Password and<br />
then select Log In button.<br />
After logging in successfully you should see your application list. Be<strong>for</strong>e selecting any icons you will first<br />
need to download the web client by clicking on the security warning at the top of the website just below<br />
your address bar: (If you do not see the download option below please see #2)
Select option: Download File…<br />
At the File Download window, select Run to install the ica<strong>32</strong>web.msi installer package:
After selecting Run you should see the following window showing the download of the installer package:<br />
After the installer package is downloaded select Run to install the <strong>Citrix</strong> <strong>Web</strong> <strong>Client</strong>:
At the <strong>Citrix</strong> Presentation Server <strong>Client</strong> Setup screen select Next:<br />
Select the radio button <strong>for</strong> “I accept the license agreement” and the select Next:
Accept the default setting to Use machine name as client name. Select Next.<br />
This will start the installation. At window <strong>for</strong> successful install select Finish
After selecting Finish you can then go back and select the application in <strong>Citrix</strong> you need to access.