Accessing and Using Your UCF Webmail Account
Accessing and Using Your UCF Webmail Account
Accessing and Using Your UCF Webmail Account
- No tags were found...

Create successful ePaper yourself
Turn your PDF publications into a flip-book with our unique Google optimized e-Paper software.
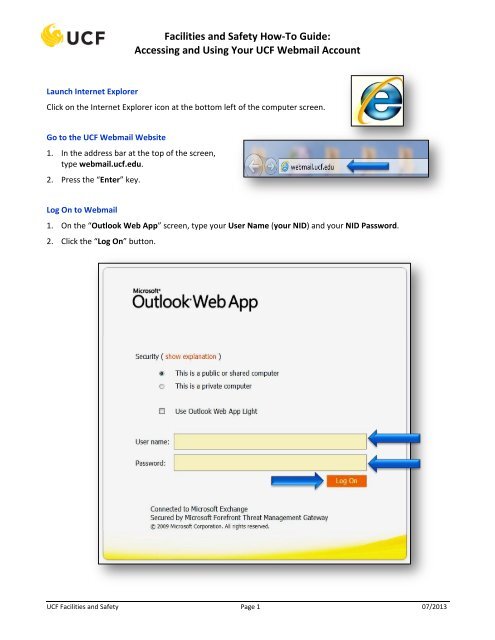
Facilities <strong>and</strong> Safety How-To Guide:<br />
<strong>Accessing</strong> <strong>and</strong> <strong>Using</strong> <strong>Your</strong> <strong>UCF</strong> <strong>Webmail</strong> <strong>Account</strong><br />
Launch Internet Explorer<br />
Click on the Internet Explorer icon at the bottom left of the computer screen.<br />
Go to the <strong>UCF</strong> <strong>Webmail</strong> Website<br />
1. In the address bar at the top of the screen,<br />
type webmail.ucf.edu.<br />
2. Press the “Enter” key.<br />
Log On to <strong>Webmail</strong><br />
1. On the “Outlook Web App” screen, type your User Name (your NID) <strong>and</strong> your NID Password.<br />
2. Click the “Log On” button.<br />
<strong>UCF</strong> Facilities <strong>and</strong> Safety Page 1 07/2013
Facilities <strong>and</strong> Safety How-To Guide:<br />
<strong>Accessing</strong> <strong>and</strong> <strong>Using</strong> <strong>Your</strong> <strong>UCF</strong> <strong>Webmail</strong> <strong>Account</strong><br />
This will take you to your <strong>UCF</strong> <strong>Webmail</strong> screen, which contains the same information that appears in your<br />
regular Outlook account but in a slightly different format.<br />
Each part of this screen is described in more detail on the next page.<br />
<strong>UCF</strong> Facilities <strong>and</strong> Safety Page 2 07/2013
Facilities <strong>and</strong> Safety How-To Guide:<br />
<strong>Accessing</strong> <strong>and</strong> <strong>Using</strong> <strong>Your</strong> <strong>UCF</strong> <strong>Webmail</strong> <strong>Account</strong><br />
Parts of the Mail Screen<br />
Menu Bar Mailbox Reading Pane<br />
Scrollbar<br />
In the Menu Bar above:<br />
• The “Mail” view is selected, as indicated by the gray highlighting. This displays all of your Mail folders<br />
(e.g., Inbox, Drafts, Sent Items, Deleted Items).<br />
• The “Inbox” folder is selected.<br />
• Click <strong>and</strong> drag the Scrollbar on the right to move down <strong>and</strong> see your other folders.<br />
The Mailbox displays all of the emails in the selected folder (“Inbox” is selected here). In this example, there<br />
are two messages.<br />
Click on the Envelope icon to select a message to view (in this example, the “Outlook Directory – Add Phone<br />
Number” message is selected, as indicated by the checkmark <strong>and</strong> highlighting). The email text will appear in<br />
the Reading Pane. If needed, use the Scrollbars on the right <strong>and</strong> bottom to move down <strong>and</strong> across to view the<br />
entire email.<br />
Hint: To view a message in a bigger window, double-click on the title of the message in your mailbox. A<br />
separate window will open that displays the message in a format that is easier to read.<br />
<strong>UCF</strong> Facilities <strong>and</strong> Safety Page 3 07/2013
Facilities <strong>and</strong> Safety How-To Guide:<br />
<strong>Accessing</strong> <strong>and</strong> <strong>Using</strong> <strong>Your</strong> <strong>UCF</strong> <strong>Webmail</strong> <strong>Account</strong><br />
Reply to or Forward a Message<br />
At the top right of the message in the Reading Pane is a set of curved arrow icons.<br />
• Click on the purple arrow at the far left to reply to the person who<br />
sent you the message<br />
• Click on the double purple arrows in the center to reply to the sender <strong>and</strong> to everyone else to whom<br />
the message was sent (“Reply All”)<br />
• Click on the blue arrow at the far right to forward the message to another person<br />
When you click one of these icons, a new window will pop up where you can type <strong>and</strong> send your reply, or add<br />
a note if you are forwarding the message to someone else.<br />
When you are ready to send your message, click on “Send” at the top left of the window.<br />
Reply<br />
Reply All Forward<br />
<strong>UCF</strong> Facilities <strong>and</strong> Safety Page 4 07/2013
Facilities <strong>and</strong> Safety How-To Guide:<br />
<strong>Accessing</strong> <strong>and</strong> <strong>Using</strong> <strong>Your</strong> <strong>UCF</strong> <strong>Webmail</strong> <strong>Account</strong><br />
Send a New Message<br />
1. At the top of the Mailbox section of the screen, click on “New.”<br />
A blank message window will pop up.<br />
<strong>UCF</strong> Facilities <strong>and</strong> Safety Page 5 07/2013
Facilities <strong>and</strong> Safety How-To Guide:<br />
<strong>Accessing</strong> <strong>and</strong> <strong>Using</strong> <strong>Your</strong> <strong>UCF</strong> <strong>Webmail</strong> <strong>Account</strong><br />
2. To select message recipients, click on the “To…” button at the left of the screen. The Outlook Directory<br />
will pop up. Type in the name of the desired recipient <strong>and</strong> click on the magnifying glass icon.<br />
<strong>UCF</strong> Facilities <strong>and</strong> Safety Page 6 07/2013
Facilities <strong>and</strong> Safety How-To Guide:<br />
<strong>Accessing</strong> <strong>and</strong> <strong>Using</strong> <strong>Your</strong> <strong>UCF</strong> <strong>Webmail</strong> <strong>Account</strong><br />
3. From the names that appear, double-click to select the person you want to send the message. Their name<br />
will then appear in the “To” field at the bottom of the window.<br />
Repeat this process for all desired recipients. When finished, click on “OK” at the lower right of the screen.<br />
This will take you back to the message window.<br />
<strong>UCF</strong> Facilities <strong>and</strong> Safety Page 7 07/2013
Facilities <strong>and</strong> Safety How-To Guide:<br />
<strong>Accessing</strong> <strong>and</strong> <strong>Using</strong> <strong>Your</strong> <strong>UCF</strong> <strong>Webmail</strong> <strong>Account</strong><br />
4. Click in the “Subject” field <strong>and</strong> type in a brief description of the purpose of your email.<br />
5. Click in the message body field <strong>and</strong> type your message.<br />
6. When finished, click on “Send” at the top left of the window. A copy of the message will be stored in your<br />
“Sent Items” folder.<br />
<strong>UCF</strong> Facilities <strong>and</strong> Safety Page 8 07/2013
Facilities <strong>and</strong> Safety How-To Guide:<br />
<strong>Accessing</strong> <strong>and</strong> <strong>Using</strong> <strong>Your</strong> <strong>UCF</strong> <strong>Webmail</strong> <strong>Account</strong><br />
Delete a Message<br />
1. In your Mailbox, click on the message you would like to delete.<br />
2. Click on “Delete” at the top of the screen.<br />
Deleted messages will be moved to your Deleted Items folder.<br />
Sign out of <strong>Webmail</strong><br />
Click on “Sign Out” at the top right of the screen, next to your name.<br />
IMPORTANT! Be sure to follow the <strong>UCF</strong> Email Retention Policy, which can be found here:<br />
http://policies.ucf.edu/documents/4-001RetentionRequirementsforElectronicMailFINAL2007.pdf<br />
<strong>UCF</strong> Facilities <strong>and</strong> Safety Page 9 07/2013