iobnet.co.in Register For Internet Banking : Indian Overseas Bank
Organization : Indian Overseas Bank
Service Name : Register For Internet Banking
Applicable State/UT: All India
| Want to ask a question / comment on this post? Go to bottom of this page. |
|---|
Website : https://www.iobnet.co.in/ibanking/html/index.html
What is IOB Internet Banking?
Internet Banking is the online banking service provided by Indian Overseas Bank for the benefit of customers to access and transact on their account 24*7 on all 365 days
Related / Similar Facility : IOB Savings Account Opening Registration
2. Services provided:
You can access the following services using Internet banking
** Balance enquiry
** Last Few transactions
** Account Statement
** Cheque Book Request
** Cheque Paid Status
** Deposit Opening
** Transfer money to any of your bank accounts(within and outside IOB)
** Schedule your funds transfers
** Schedule Credit Card Payment
** Suspend your IOB debit card
Also you can pay your:
** Direct Taxes
** Indirect Taxes
** College Fees for the students of SASTRA-Tanjore
** Utility bills like Insurance, mobile etc and many more.
** Tamilnadu Electricity board bills
** Recurring deposit/Loan installments
** IOB Credit card dues
Who Can Register For IOB Internet Banking?
** Savings/ Current account holders
** Deposit / Loan account holders
** Proprietary firms
** Partnership companies
** Limited Companies
** Societies/Trusts
** HUFs
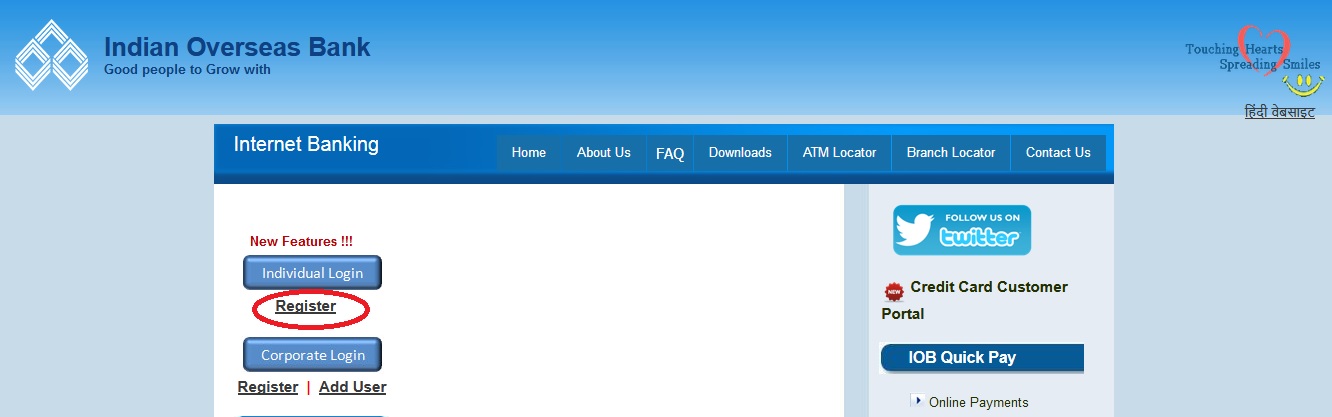
How To Register For IOB Internet Banking?
Step 1:
** Login to www.iobnet.co.in
** Click on “Register Individual” if you are an individual or a proprietary firm.Else click on “Register Corporate”
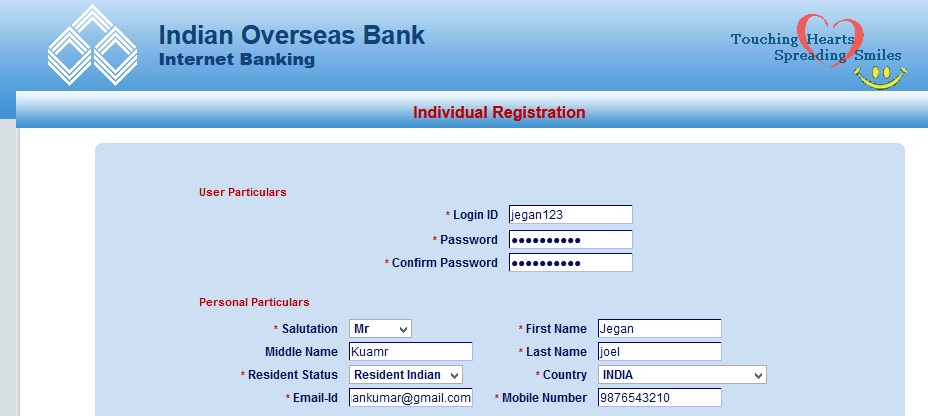
Enter User Particulars,Personal Particulars,Account Particulars Details
Enter Captcha Code as shown below,then click on submit button.
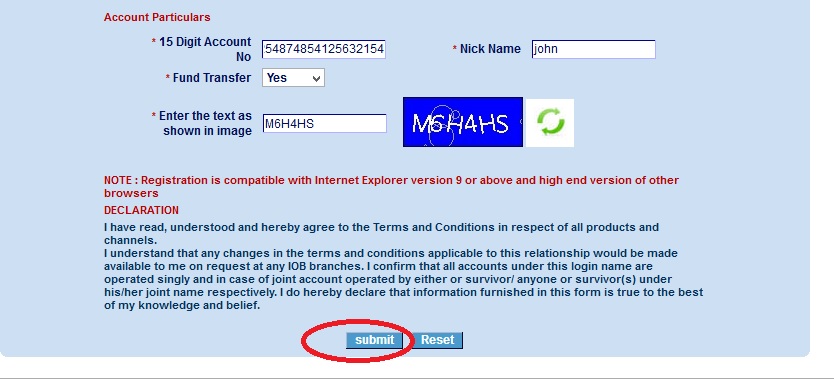
** Once registered submit the application forms and the annexure displayed to you(in case of Companies/Partnership
firms/Societies/Trusts) to your branch
** An active E-mail id is necessary to open internet banking.
** Note down the PIN number which is to be used for all Funds transfer transactions
(Don’t share this with anyone! Do we keep a blank cheque carelessly? NO ! Your password and PIN are as important as that!)
** Your account will be activated by the branch on receipt of the application
Step 2:
** Login with your password.
** Passwords are case sensitive (b is different from B)
** Login Password & transaction PIN are different where password is used to login and PIN for funds transfer.
** Please be careful while entering your passwords, as your online account may be blocked for entering consecutive wrong passwords.
User id for corporate login:
** Every company account (other than proprietary firm) can be viewed by any number of persons.
** The name of the company can be the corporate id and the name of the user is the user id.
** For instance, for GM Finance of ABC Limited, corporate id can be abc ltd and the user id can be gmfin, accounts etc.
** This enables any number of users to view/transact on their account with their own identity.
5. E-Tokens:
E TOKEN is a small USB drive like device which has a digital certificate in it and sent to the customer.
It will be used as an additional authentication mechanism apart from password to secure your account during login and funds transfers. Currently E-tokens are being given to corporate only.
** To apply for E-Token login to internetbanking –> accounts –> apply for digital signature (this feature is available only for corporate login)
** Fill the form online and submit
** ITD processes the request and sends the eToken by post
** On receipt of eToken, log in to see a “Register Certificate” link on home page
** Fill the details to activate the token
** Rs 625 is charged per token
** A separate token is to be used by each user of a corporate login
6. Multiple Login Concept:
In case you have forgotten to logout from the Internet banking, it prompts for an additional OTP when you login next time.
OTP will be sent to your mobile number registered with the bank.
This feature is introduced as an additional measure of security.
7. Activation of account:
Branch will activate you account once on receiving the application from you.
** Once your account activated you will receive an e-mail saying that your account is activated
** If account is not activated even after submitting the application form to branch, do mail us with the account details to eseeadm@iobnet.co.in Or talk to us at 044-28519460/28889350
8. Deactivate accounts:
Your account may be de-activated using the following steps. To again activate your account, contact your branch.
** Login to Your Internet Banking account
** Go to “Edit Profile”
** Select Deactivate account
** Select the appropriate account to be deactivated and then click “submit”
9. Change Password:
To change the password for your internet banking follow the below procedures
** Login to your Internet Banking account
** Go to “Edit Profile”
** Select the “Change Password” option
** Enter the current password and new password in appropriate fields and click on “submit”
10. Change pin:
To change the pin for your internet banking follow the below procedures
** Login to Your Internet Banking account
** Go to “Edit Profile”
** Select “Change Pin”
** Enter the current pin and new pin in appropriate fields and click on “submit”
11. Change Nickname:
You can name your account using a nickname.
For e.g., if it is your salary account just name it as “salary”.
Caution: never give same nickname to two accounts
** Login to Your Internet Banking account
** Go to “Edit Profile”
** Select “Change Nickname”
** Select the account for which you need to change the nick name, enter the new nickname and click on “submit”.
12. Change services:
You can disable fund transfer for your accounts
** Login to Your Internet Banking account
** Go to “Edit Profile”
** Select “Change Services”
** Select the account for which you need to disable fund transfer.
** If you need to disable fund transfer uncheck the “allow fund transfer” checkbox and click “submit”
To enable fund transfer, you need to go to branch and give them a letter stating to allow fund transfer through online for
your account
13. Add accounts:
At the time registering there is an option to add more than one account.
Otherwise when the first account gets activated, you can login with your login id and password.
** Select Edit Profile –> Add Accounts and give the details of the accounts which you wish to add.
** On completion of account addition, take a printout and submit it.
Benefits of IOB Internet Banking
Indian Overseas Bank (IOB) Internet Banking is a secure and convenient way to access your bank account online.
It offers a wide range of features, including:
** Account balance: You can check your account balance at any time.
** Transaction history: You can view your transaction history for the past 6 months.
** Fund transfer: You can transfer funds between your IOB accounts or to other bank accounts.
** Bill payment: You can pay your bills online, such as electricity, water, and phone bills.
** Mini statement: You can download a mini statement of your account transactions.
** E-statement: You can subscribe to e-statements and receive your account statements online.
Additional Simplified Procedure
To register for IOB Internet Banking, follow these steps:
1. Visit the IOB Net Banking website: https://www.iobnet.co.in/
2. Click on the “Personal Login” tab.
3. Select the “Register” option.
4. Enter your basic information, including:
** 15-digit account number
** Email ID
** Country
** Mobile number
5. Create an Internet banking login ID and password of your choice.
6. Submit the form.
7. If you are eligible for self-activation, you will be given the option to activate your account through debit card validation or through a branch.
8. If you opt for self-activation, you will be required to enter your debit card number, expiry date, and PIN
9. An OTP (One-Time Password) will be sent to your registered mobile number
10. Enter the OTP and verify your card details to complete the registration process.
11. Once your registration is complete, you will be able to log in to IOB Net Banking and start using its online banking services.
Here are some additional tips for registering for IOB Internet Banking:
** Make sure you have a valid email address and mobile number.
** Create a strong password that is difficult to guess.
** Do not share your login ID, password, or PIN with anyone.
** Keep your computer and internet security software up to date.
Telephone Bill Paid on 26/08/2016 through onlone payment for Rs.878.00. This payment amount debited from my A/c. But Not done Telephone Dept. Please check and refund this amount.
I was applied INTERNET BANKING OPERATION FACILITY. But till not get reply.