
by Irina Bulygina
How to successfully submit an app to the App Store for review

The Apple team has a strict vision concerning the quality of mobile applications. This is really great for the users, because the Apple team works hard to make the App Store a trustworthy ecosystem. The App Store has a high threshold and tough requirements, not only for the app’s performance but for the implementation of appropriate security measures. The user can be sure that iOS applications are reliable.
However, meeting all the requirements can become a real hell for developers. Just to compare, the development of the application can take only a few weeks, while the time spent passing the App Store review can be up to a month (or even months if the developer disregards Apple’s developer guidelines).
I'm working at Dashdevs as a Client Engager. My main duty is to create applications from scratch so they pass the review. I work with clients’ requirements. We have more than 9 years of expertise in the development of iOS applications. We’ve worked with various markets, industries, and different companies.
The complexity of the applications varies, too. We submitted 250+ apps for review during 2018. Not all of them passed the review the first time. But sometimes we felt real unbridled joy from a good review.
In this article, I want to share our experience so you can avoid common mistakes and easily pass the review stage.
How to apply to the App Store
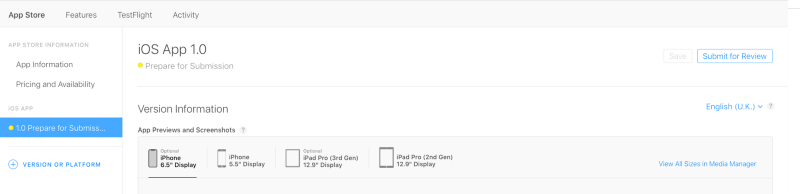
A shiny brand-new iOS application has been developed, tested, and is ready to see the world. A binary file is already uploaded to the iTunes Connect panel. But what else is needed?
- You need to add basic information (description, tags, contacts) about your application, add screenshots, and credentials of a demo user account (if your application requires the authorization).
- You need to include detailed explanations of non-obvious features (like native gesture usage) and in-app purchases in the App Review notes.
- Then you need to press the button “Submit for Review” to inform Apple that your application is ready for the App Store.
You’ll be notified if something important in the description is missing. Then the application status review will be changed to “Waiting for review”. It can take a few days before the real check begins. When the verification team actually starts the review, the status of the application will be changed to “In Review”.
Hint: You will save some effort by installing the iTunes Connect application on your iPhone to receive immediate notifications about all the status changes.
App Store review is a mandatory step for all applications. The process of app verification sticks to the Apple Guidelines ensuring the best and the safest user experience.
They also review the primary information about the application. A part of the verification is done automatically using scripts, and people perform the other one. If your application has an issue, you will receive a notification with a precise description of what should be fixed. The timeframe for the first stage of review runs between 3 to 7 days. The inspection of the application updates is quicker — from 1 to 3 days.
Over the last few years, I’ve had some problems with applications submitted for review. Some of them were easy to fix, and some took many hours.
So, why didn’t your applications pass on the first try?
Here’s what you need to take into account.
Use Human Interface Guidelines (HIG) for the design
Your designers should follow the HIG from the very beginning. Sizes and positions of the buttons, the correct usage of the basic UI elements, and navigation must comply with Apple Guidelines. Fixing issues with HIG can cost you a lot if you find these issues at the end of the development.
Hint: Do not create an application that appears confusingly similar to an existing Apple product or any other application (no copycats). The Apple team is very strict about this.
Check the functionality list
Your application must include features, content, and a UI that elevate it beyond a repackaged website. The Apple team cares about the usefulness and benefits to the user.
There was a case when one of our applications was rejected because the Apple review team assumed that our app didn’t need to have the Sign up/Sign in functionality. So, we sent a notice of appeal with the evidence of the relevancy of this functionality.
Another case was a little bit different — the application was too simple for the AppStore (just a funny calendar). The application needed additional functionality. We improved it by adding a sharing feature, and it passed the review.
One more significant rule to refer to is that your application must not require the installation of other applications.
Provide a demo account with full functionality to the Apple team
The App Store reviewing team will definitely try to register your app, but they will need to verify the rest of the features as well. For example, to review the functionalities of a bank application, they need to have an account with an activated card and some transactions on it. You need to be sure that the account accesses full functionality and all the back-end features are turned on.
Hint: do not provide this account to your QA team for usual testing, especially during the review period. Once, we sent an application for review, and at the same time our Quality Assurance engineer was testing the blocking functionality and occasionally banned a new user.
No “test”, “coming soon”, “beta”, “trial”, “Testflight” in the app.
All your future, unfinished, demo functionality must not be used in the app. Do not use these words for your application content at all, even for in-app screenshots and descriptions. If you need to test your application, you can join Testflight services.
We once made a ridiculous mistake with another one of our applications. As you might know, to prepare a submission to review, developers sometimes take screenshots of the application right from the TestFlight. These pictures are posted as the screenshots of the real app for the App Store. If you do so, check twice, as there can be the “Testflight” label in the status bar. When this happens, your application is rejected. This itty-bitty thing may block the submission of your application.
Performance
No crashes, no slow performance, no memory leaks are allowed for App Store applications. Incomplete app bundles and binaries that crash or perform with obvious technical problems in applications are rejected at once.
Describe only the existing functionality
No advertisement for future features should be in the description of the app.
Terms and Conditions / Privacy Policies.
These documents or the links to them must be added to the app. You need to explain to the user how their sensitive data is processed and what data is shared by the app with third parties and for what purposes (e.g., analytics tools, advertising networks, and third-party SDKs, etc.). A user needs to know the deletion and retention policies of your application.
Intellectual Property
You need to have permissions to use all materials in the app (copyright issue). Do not use third-party trademarks, copyrighted works, or patented ideas in your app if you have not obtained the necessary license. Remember about the restrictions against using sexual or pornographic content, marijuana, tobacco, controlled substances, misleading quotations of religious texts, and violence in mobile applications.
Licenses
If some regulations within your business area demand a license for providing your services, such as FinTech, Medicine, Healthcare, etc., you need to attach a copy of those documents to the application review. If an app requires specific hardware, you need to provide a corresponding certificate or license for this hardware.
Another case from our experience: an application used a special sticker printer. At first, the application was rejected, and we needed to get a certificate to use those printers. It took us a month to get the official approval from the producer of the hardware.
Another example was a digital bank application. We needed to provide the App Store review team with the E-money License. This also applies to the cryptocurrency-industry.
“Apps facilitating Initial Coin Offerings (“ICOs”), cryptocurrency futures trading, and other crypto-securities or quasi-securities trading must come from established banks, securities firms, futures commission merchants (“FCM”), or other approved financial institutions and must comply with all applicable law”.
Ask user for permissions
Your application must ask permissions for using a camera, microphone, location, access to contacts, Camera Roll, and user locations. The permissions must be relevant to the application’s functionality. The App Store team cares that the information collected in the application is stored in the right way and prevents its unauthorized use, disclosure, or access by third parties.
Hint: don’t forget to add a description of these permissions to the .plist file. This is another common reason for rejections.
No mock-up data in the app
If your application has no content for some forms you need, hide this element or add a placeholder for it with an explanation how the user can get the necessary data.
Sometimes developers hardcode to show the maximum user functionality. For example, your application has a section with charts displaying the user’s activity statistics in the app. In this case, there must be a placeholder with a prompt text that the chart will be available when the user starts to use the app on an everyday basis.
With advertisements, things are the same — you can not submit the app with empty ad banners or test adverts.
Ability to moderate user’s content
“Block a user/content”, “report a user/content”, “blacklist for users” are required functionalities for the app if it provides multi-user communication (e.g. feeds, chats, groups). As a product owner, you need to be conscious that different people will use your application and some of them may disturb others. You need to provide your users with the ability to manage the content and the community they’re interacting with.
Options for release
With every submission for review, my team gains new experience. My main advice is to submit your application to the App Store review as soon as you have developed the MVP of your application. Keep in mind that even if you pass the review, it does not mean that the app will be released.
There are three different actions you can take after a successful review:
- Manually release this version: as a developer or an application manager, you need to go to the iTunes Connect panel and press the button to release the app.
- Automatically release this version: that means that the application will be published as soon as it passes the review.
- Automatically release this version after App Review, no earlier than…: you can select the time/date for the release. If your application passes the review, it will be published at that time.
These options can help developers and product owners/managers to pass the review and wait for the marketing campaign to start. You need to know that the first app review is the most critical, and so the App Store team verifies the application for a much longer period and more thoroughly. Every further update is reviewed as well, but it takes less time for the verification. Sometimes can take just a few hours.
The App Store may reject your application. That’s OK. Do not panic. If you understand the reason, you just fix the issue and resubmit the application for review again. If you have questions or would like to provide additional information, you can use the Resolution Center to communicate with the App Review team. They are supportive and ready to help you with your application. We have fixed a lot of issues with their help.
I hope my examples mentioned in this article will be helpful for you and all your IOS applications will pass App Store verification on the very first attempt.
P.S. Useful links: