Learning Objectives
-
Create a new, cloud-based application using Firebase.
-
Configure an app to use Firebase resources.
-
Add a pre-built login screen using Firebase Authentication, and use this to add Google Login to an app.
-
Customize the login screen by changing the background color and adding a logo.
Video Lesson:
Reference
Creating and Configuring a Firebase Project
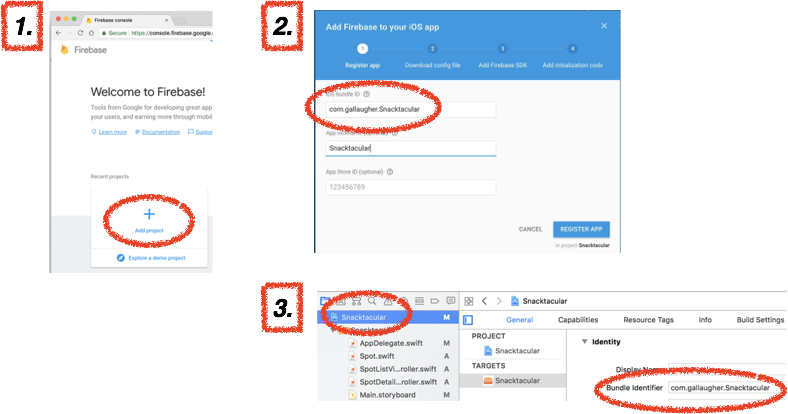
The steps below (numbers correspond to the images after the bullet points) should work to create a new Firebase Project, and to configure an Xcode project to connect to and work with this Firebase project. The only step that may require changes is the cocoapod installation, depending on features that you’ll be using in your app. To find a full list of available cocoapods, along with their configuration pod lines to add to your project’s pod file, scroll to the “Available Pods” section on Google’s Add Firebase to your iOS Project page.
-
Add the Cocoapods to your project. At a minimum you’ll need pod ‘Firebase/Core’ and pod ‘FirebaseUI’ in your podfile before you perform pod install. Our app will eventually use cocoapods for ‘Firebase/Storage’and ‘Firebase/Firestore’, which were also installed in an earlier video lesson.
-
Create a project for your app at firebase.google.com – A Firebase project will house the shared, Google-managed resources used by your app. You can create several projects for several apps (e.g. a project for Snacktacular, another for a shared To Do List, etc.) Your iOS app will access this project, and the Firebase project can also be shared with Android and web apps, as well.
-
Sign in with your Google credentials (e.g. your gmail.com account).
-
Click the “GO TO CONSOLE” button in the upper right-hand corner.
-
Click “+ Add Project” [1]. The “Create a Project” dialog will open.
-
Give project a name then select > “Create Project”. You’ll return to the web on a “Get started here” screen.
-
Select “iOS”. This should show the “Add Firebase to your iOS App” dialog.
-
Paste or enter your app’s Bundle ID in the iOS bundle ID field. [2]
-
You can find and copy your app’s Bundle ID from inside Xcode. Show the project settings for your app by selecting the blue icon with your app’s name at the top of the project navigator, then in the TARGETS (left) and General (top) screen showing, you’ll see “Bundle Identifier” listed as the second item. It should read something like “com/your-last-name/your-app-name” [3].
-
-
Give your app a nickname, if you’d like (the app’s name is usually fine), then click REGISTER APP.
-
-
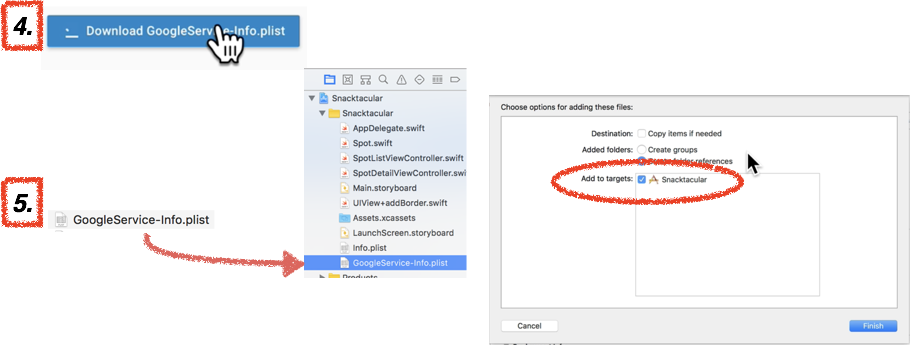
Click the “Download GoogleServices-Info.plist” button and save the file in your Xcode project [4].
-
Important: make sure this file is named GoogleServices-Info.plist. If you’ve already downloaded this file to your project folder, or if you are downloading to another folder like Downloads that already has a file of this name, your file may have a trailing number in it’s name (e.g. GoogleServices-Info.plist (1)). Be sure to remove any trailing number before adding the file to your Xcode project.
-
-
Drag the GoogleServices-Info.plist from the Finder into your Xcode project, at the root-level of the project navigator(putting it below the existing info.plist is a good place). Make sure the option Add to Targets: your-app-name is checked and click the Finish button. [5]
-
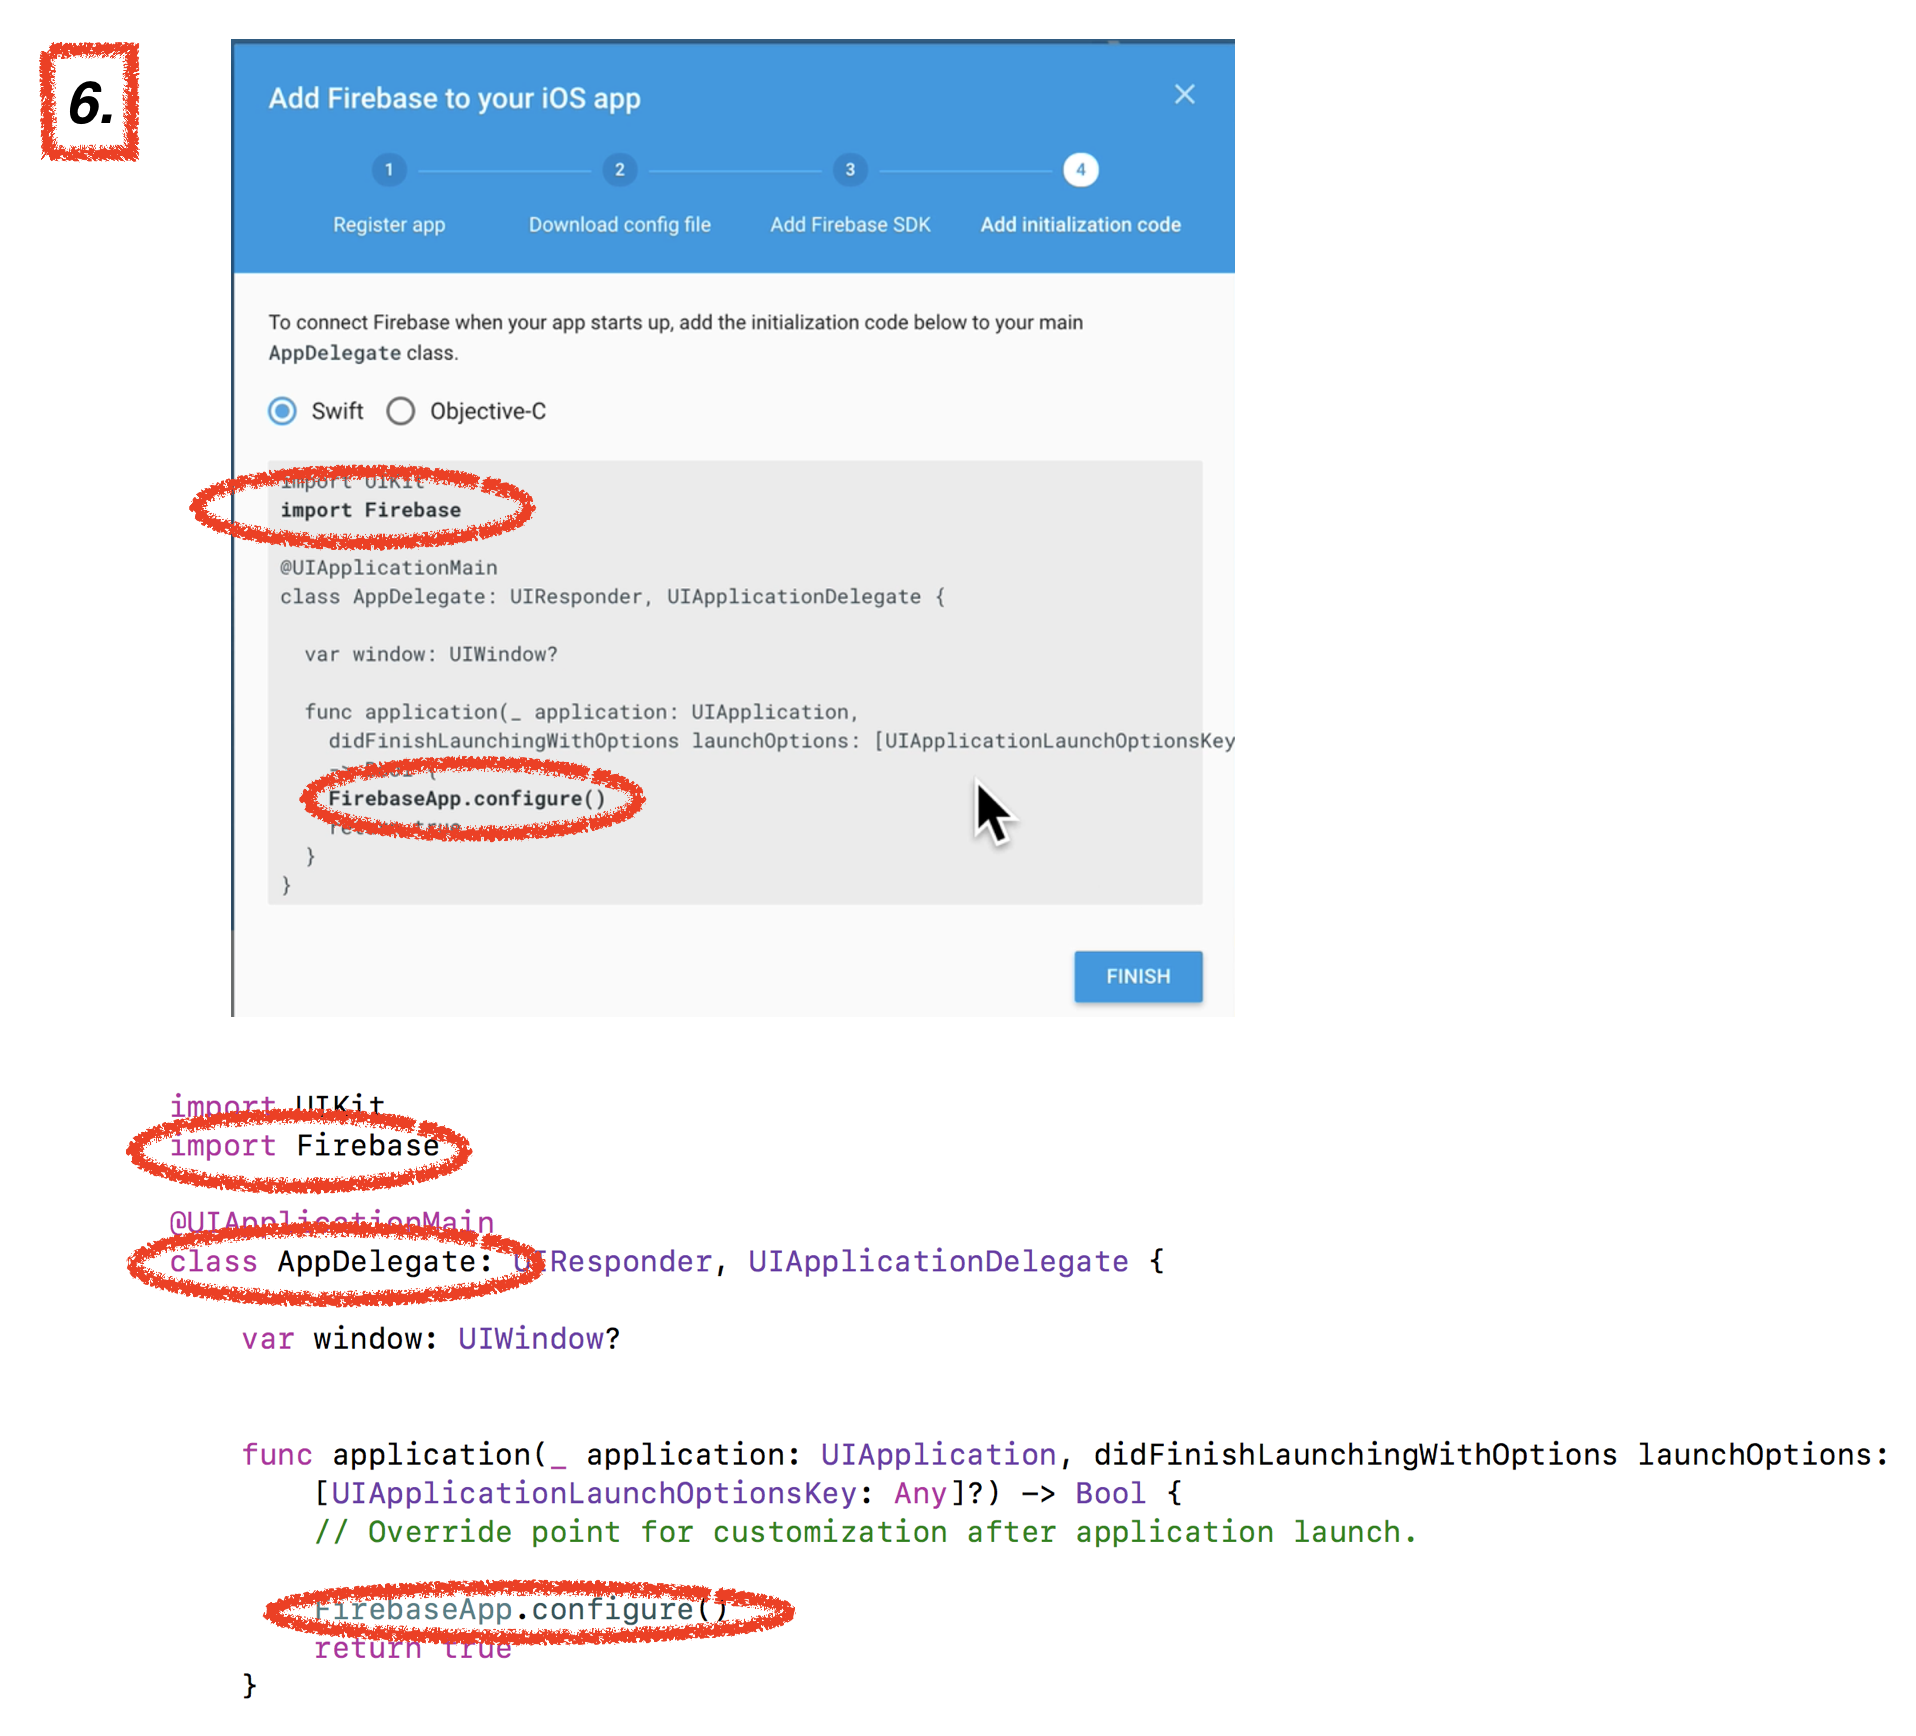
Return to the Web and press the Continue button. This next page will give you instructions on installing Cocoapods, but we’ve already done this, so you can click Continue again, and you’ll arrive at the Add Initialization Code dialog [6] (note that this dialog shows the two lines of code in bold, which you’ll be adding in the steps below, so feel free to copy and paste to avoid typos).
-
Add the Firebase initialization code to your project’s AppDelegate.swift file by following these steps [6]:
-
Return to Xcode, and in the project navigator, select the AppDelegate.swift file (the file will look like the code snippet shown beneath the dialog box below).
-
Import the core Firebase framework into the app by the statement import Firebase beneath this file’s import UIKIt statement.
-
Add the following line just before the return true statement in this file’s first application function
-
FirebaseApp.configure()
-
Note that both of the statements are listed in this dialog box (circled below), so you can just copy and paste them into your AppDelegate.swift file.
-
-
Return to the web page and select the “FINISH” button.
-
Return to your Xcode project to perform the remaining configuration steps.
-
-
Configure the App’s URL Scheme by following these steps:
-
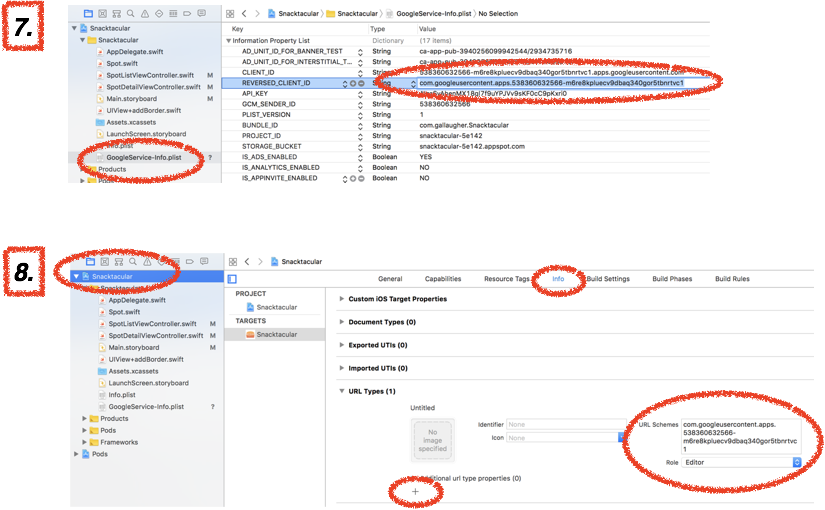
In Xcode, select your project’s GoogleServices-info.plist file from the project navigator. [7]
-
Find the row labeled REVERSED_CLIENT_ID, click twice in the value column so that you can highlight and copy the text in this cell (the text likely starts with “com.googleusercontent.apps…” [7]
-
Now show the project settings for your app by selecting the blue icon with your app’s name at the top of the project navigator, then TARGETS (left) and Info (top). Note that Info is the fourth option to the right of General, which is likely selected by default. [8]
-
Select the expansion triangle next to the heading for URL Types this line likely has as (0) after it, as well. The triangle should be pointing down to expose an area that likely says “No URL Types” at this point.
-
Click the “+” button at the bottom left of this “No URL Types” area and a bunch of fields will appear. Click inside the field labeled “URL Schemes” and paste in the text that you copied in the prior step from your GoogleServices-info.plist file. [8]
-
About Firebase Authentication
Firebase’s Authentication Framework (Firebase Auth) provides a set of tools to manage login via a variety of services. While we only use Google login in our video lesson, Firebsae Auth provides additional tools for using Facebook, Twitter, Phone number, and other methods of verification. Using third-party services can help an app attract users who might otherwise be put off by having to set up yet another login and password, or who might have concerns about storing credentials with an unknown developer. These sign-in services aren’t held on your App, nor will your Firebase project store a user’s social login credentials. Instead a service like Google will provide a temporary token, vouching for valid users. Our video lesson takes advantage of Firebase AuthUI’s pre-in, but customizable login UI, but you can also use Firebase Auth to create your own, custom login experience. While we just cover the basics in our app, you can find more complete documentation in Getting Started with Firebase Authentication for iOS page. In later videos we’ll also incorporate Cloud Firestore for shared data storage and access, and Firebase Storage for storing large files – images in the case of Snacktacular, but the project setup steps below will create a project that we’ll later expand with these other features.
Adding a basic login screen using FirebaseAuthUI
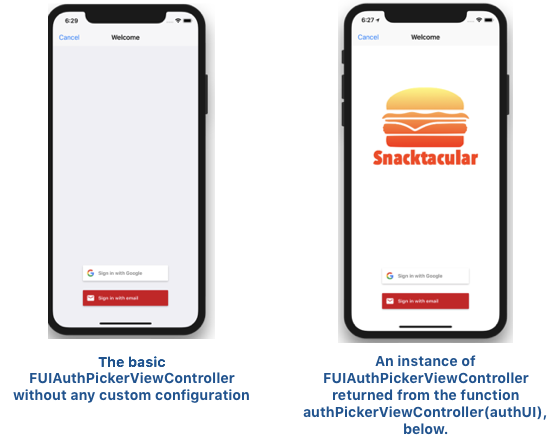
The image at the right shows the basic login screen provided by FirebaseAuthUI, configured to support Google SignIn. If other providers, such as Facebook and Twitter were configured (these would require additional code and steps), additional login buttons would be presented for those services. To implement Google SignIn as shown, follow the steps below:
-
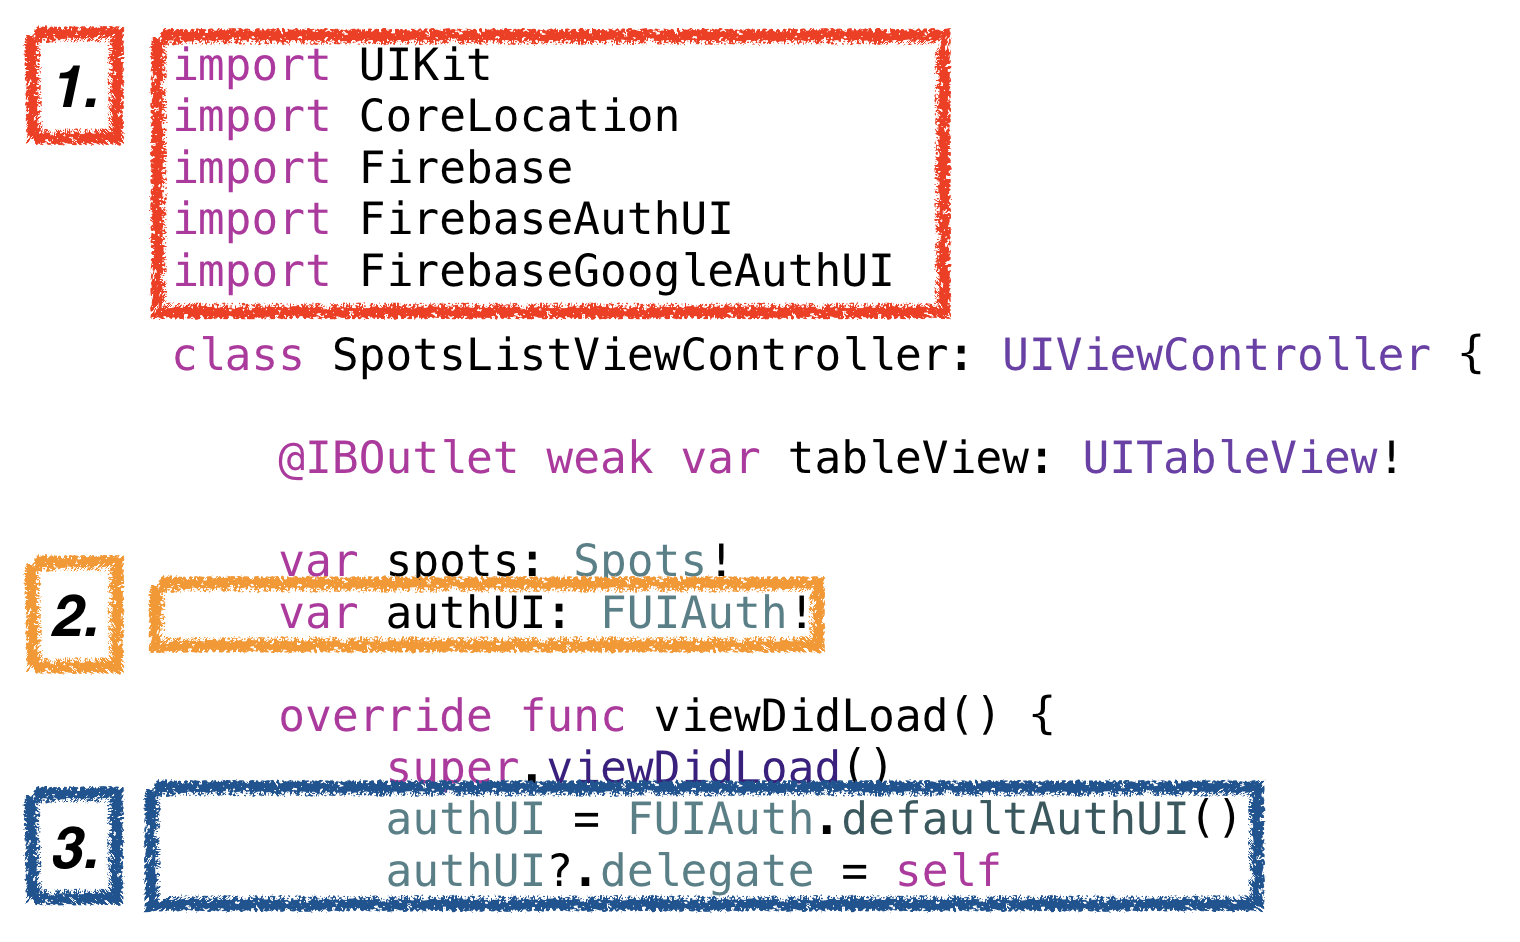
In the file associated with app’s initial view controller (SpotsListViewController.swift in our video lesson) import libraries to work with Firebase and Google sign-in.
-
Declare a variable to hold the Firebase AuthUI object (this contains data structures and methods for managing Firebase Authentication).
-
In viewDidLoad, initialize the variable you just declared, and set its delegate to self.
-
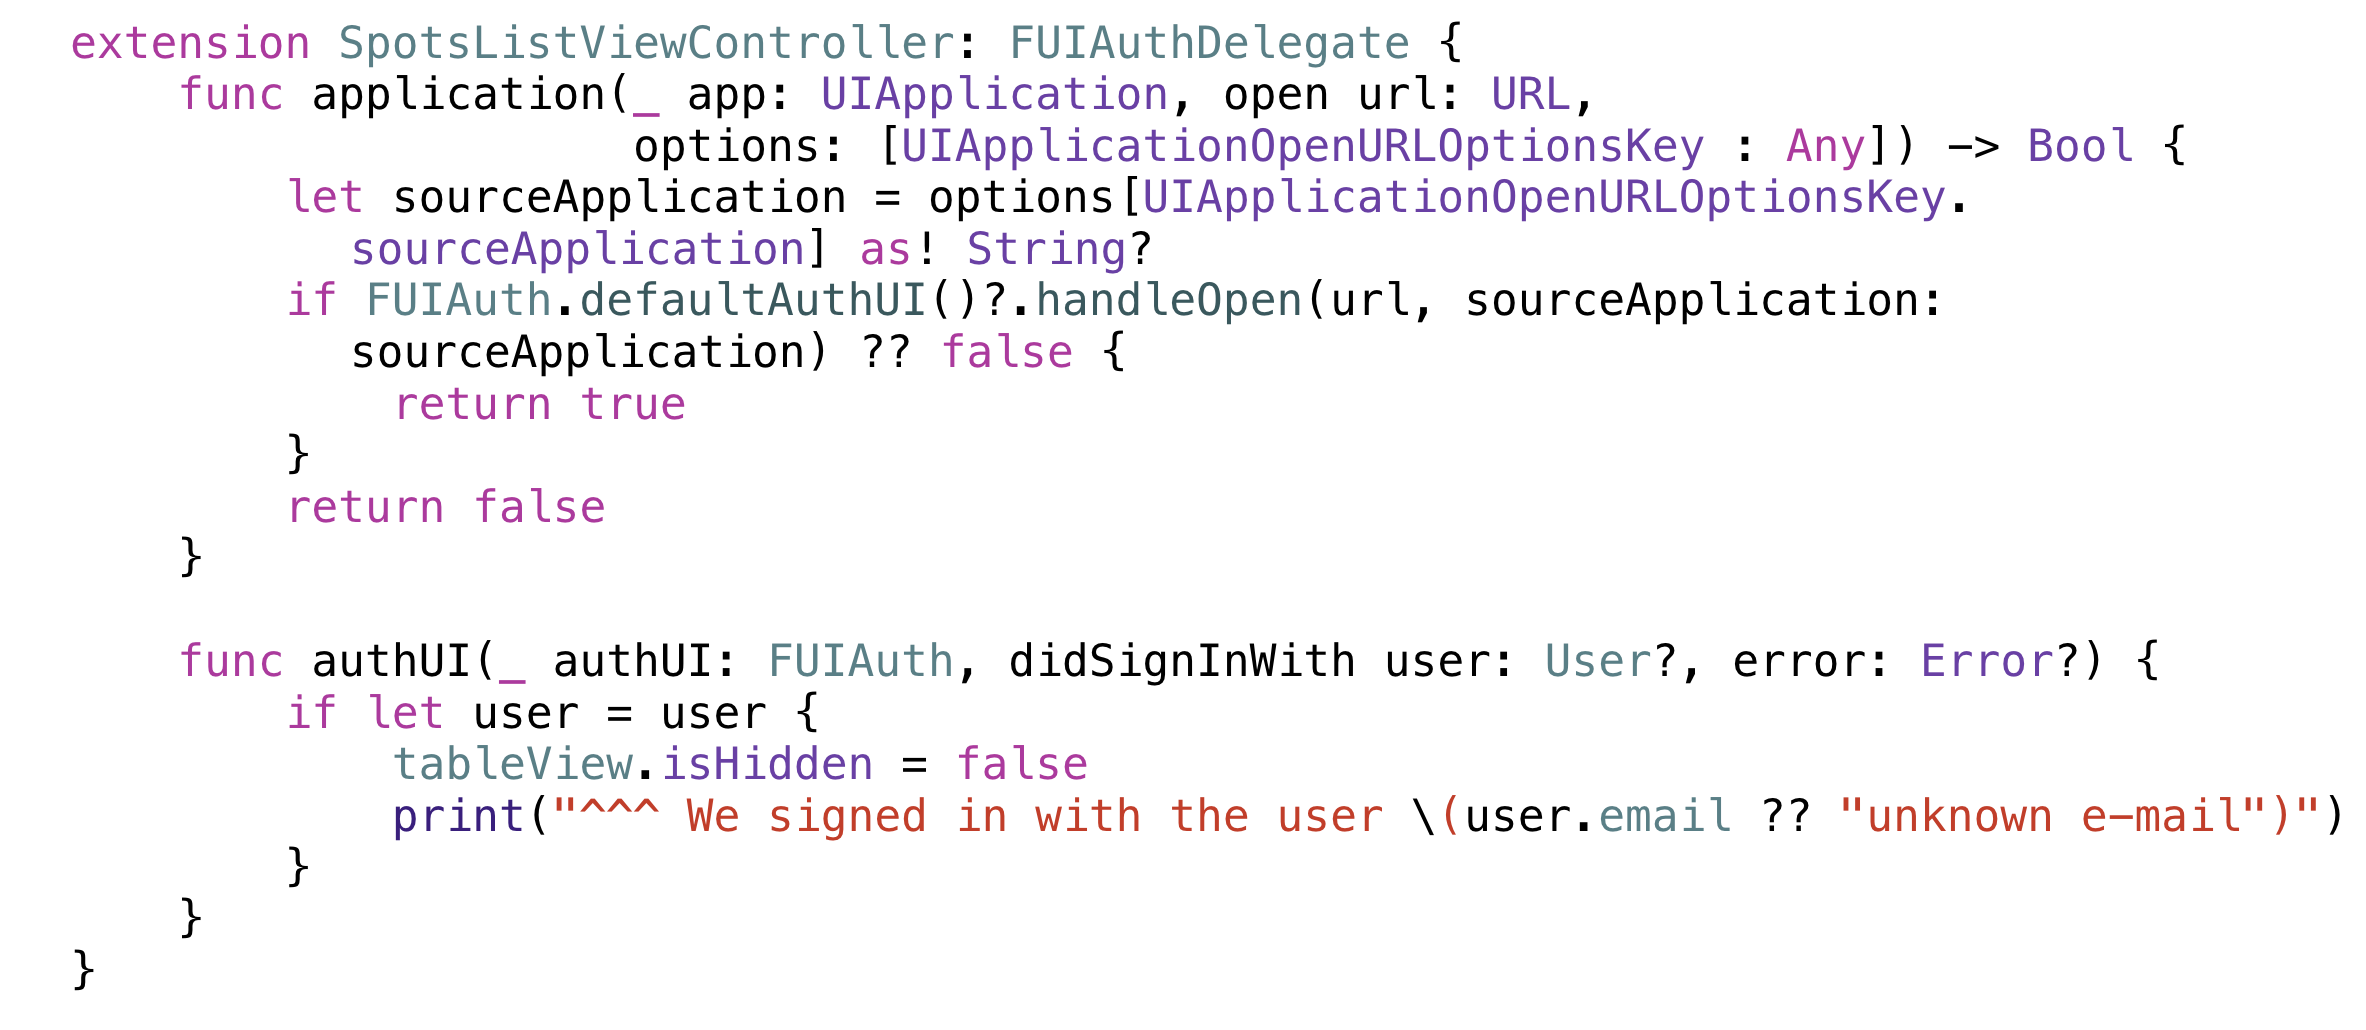
Now add an extension, as shown below. The first method is a handler for the result of the Google and Facebook sign-up flows. You can copy & paste this code, which is located about half-way down the page “Easily add sign-in to your iOS app with FirebaseUI”. The second method verifies that a valid user has logged in, and if so, the tableView is unhidden:
-
Create a signIn function – ours will set tableView.isHidden = false if a user has successfully signed in. Call this function from viewDidLoad()
-
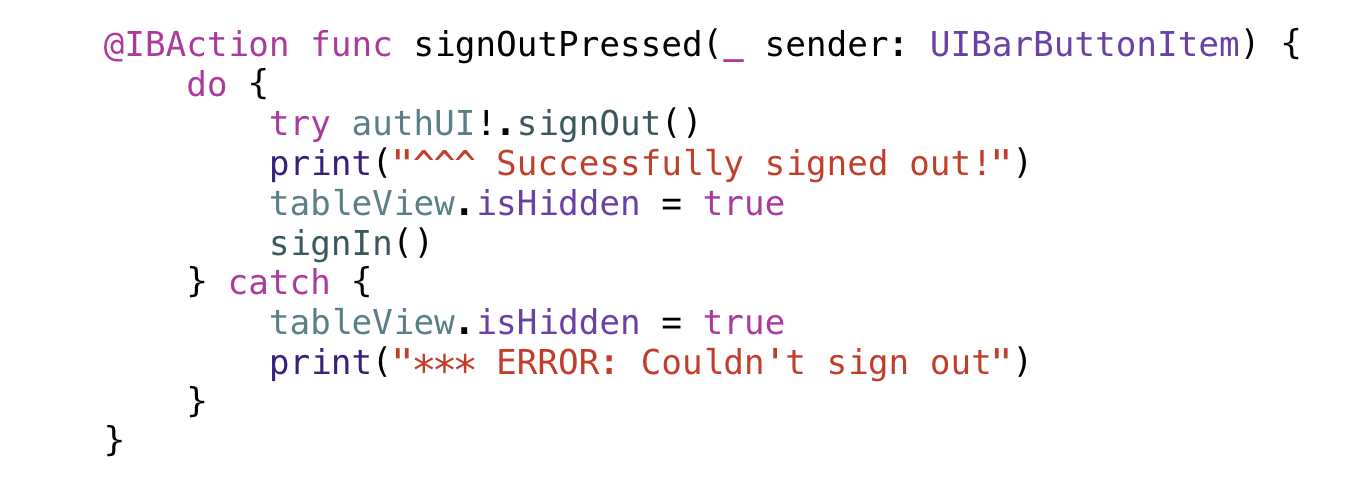
Create an @IBAction associated with a Sign Out button, if any. Note that the function below will hide the tableView when Sign Out is pressed.
Customizing the FirebaseAuthUI Pre-Built sign in view controller
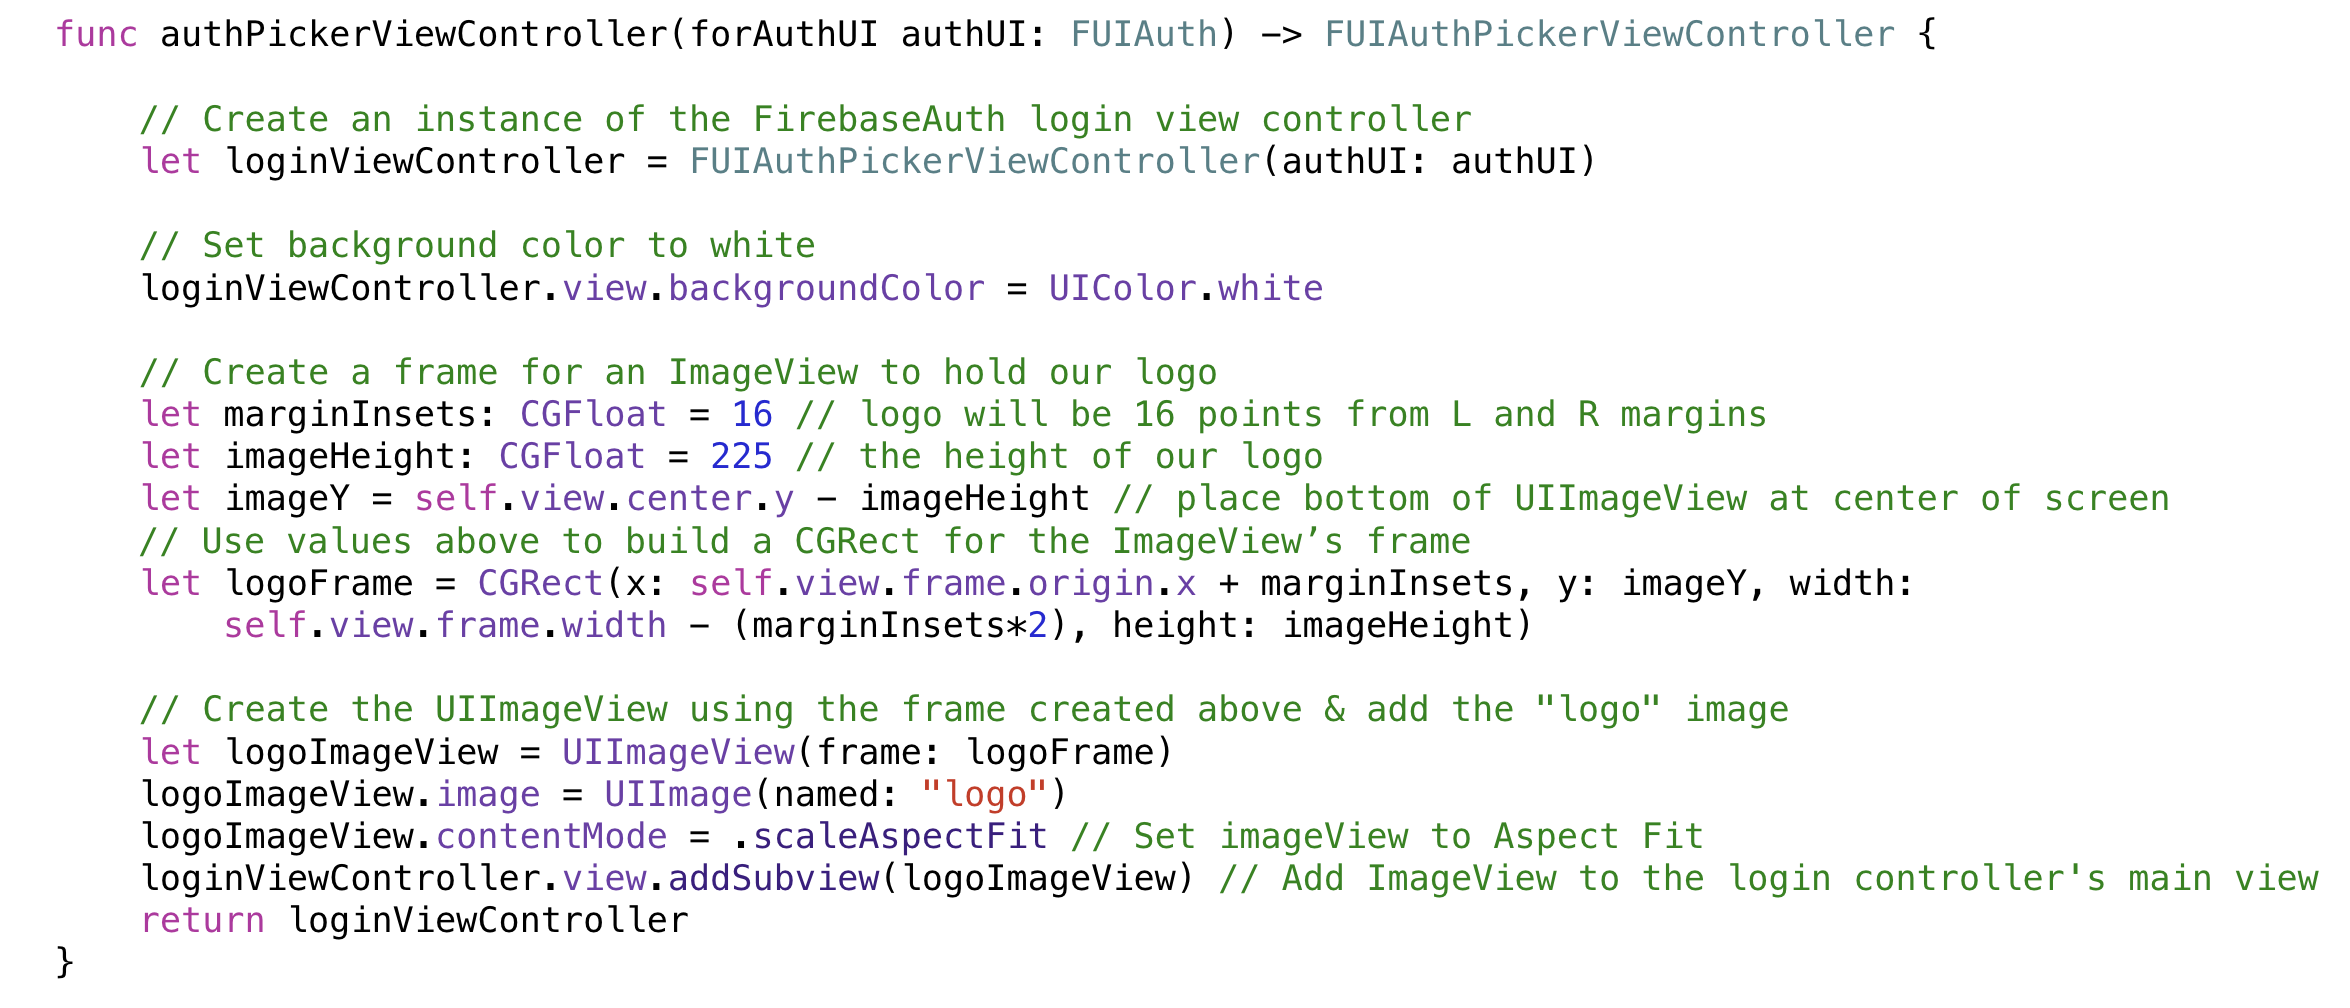
Firebase provides a pre-built sign in interface that can be created and accessed through: FUIAuthPickerViewController(authUI: authUI). The code below provides an example demonstrating configuring the Snacktacular login screen so that it changes from the default, generic version , to the customized version (both shown to the right).
This is accomplished by adding a function func authPickerViewController(forAuthUI authUI: FUIAuth) -> FUIAuthPickerViewController, which we included in our FUIAuthDelegateextension. The code below creates an instance of the Firebase authUI login view controller, sets its background color to white, creates a CGRect to frame a new ImageView that will hold our Snacktacular logo (called “logo” in the assets catalog), creates the ImageView, sets its image property to “logo”, configures the ImageView to show the image as “Aspect Fit”, adds the image (subview) inside the view controller’s main view, and returns the configured FUIAuthPickerViewController (which we named loginViewController).
Accessing an App’s User Info via the Authentication panel in the Firebase Console
The “Authentication” panel in the Firebase console will show all users who have logged into a Firebase app, including the user’s email address or other identifying credential, the provider used for login (if any), when the user’s account was created, when the user last logged in, and the unique User UID that can identify a given user. Selecting the three vertical dots to the right of any user presents options to reset a user’s password, disable the account, or delete the account.
Key Takeaway
-
Firebase includes a suite of cloud-based tools that can be used across platforms, including iOS, Android, and from web sites.
-
FirebaseAuthUI provides authentication services that would provide authentication so that users can log into an app using various third-party services, such as Google, Facebook, Twitter, GitHub, and even a mobile phone number.
-
A Firebase app is configured at firebase.google.com. This app can then be accessed by apps and websites. An app can include various services, such as the Cloud Firestore database, Firebase Authentication, and Firebase Storage (for large data files such as images and video).
-
Incorporating Firebase into an iOS requires several steps, including installing appropriate cocoapods, installing a GoogleService-Info.plist into the Xcode project, finding the REVERSED_CLIENT_ID in the GoogleService-Info.plist and pasting it into a project URL Scheme, and, in the app’s AppDelegate.swift file, importing Firebase and adding a line: FirebaseApp.configure()
-
Several additional steps are needed to take advantage of the FirebaseAuthUI pre-built sign in screen. The code above defines one approach to implementing sign in, including code used in an extension that conforms to FIRAuthDelegate. Code is also demonstrated that shows how to further configure the default view controller used in pre-built sign in.
-
The Authentication panel in the web-based Firebase Console can provide access to all users that have logged into a given Firebase app. This panel can be used to reset a user’s password, disable an account, or delete an account.

